工程化及组件化
工程化及组件化
以下为学习过程中的极简提炼笔记,以供重温巩固学习
学习准备
准备工作
html+css+JavaScript 3剑客都懂一点,完成AJAX原理,熟悉AJAX函数与调用,熟悉AJAX前端接口处理
掌握基础的 Vue核心包传统开发模式
学习目的
工程化开发
开发 Vue 的两种方式:
- 核心包传统开发模式:基于 html / css / js 文件,直接引入核心包,开发 Vue。
- 工程化开发模式:
- 编写的代码并非直接提供给浏览器运行的代码,是基于构建工具(例如:webpack) 的环境中开发 Vue。
- 让构建工具输出最终压缩的代码给浏览器运行。
构建工具编译工作流及其环节构成:
- 源代码:es6 语法 / typescript、less / sass
- 自动化编译压缩组合:webpack 配置
- 输出运行代码:js ( es3 / es5 )、css
问题: ① webpack 配置不简单 ② 雷同的基础配置 ③ 缺乏统一标准
需要一个工具,生成标准化的配置!
脚手架 Vue CLI
定义:
- Vue CLI 是 Vue 官方提供的一个全局命令工具。 可以帮助我们快速创建一个开发 Vue 项目的标准化基础架子。
- 集成了 webpack 配置
标准化基础架子
- 即:包含了标准化项目目录及基础文件,如:
- 包配置文件
- git相关文件
- 等等...
- 即:包含了标准化项目目录及基础文件,如:
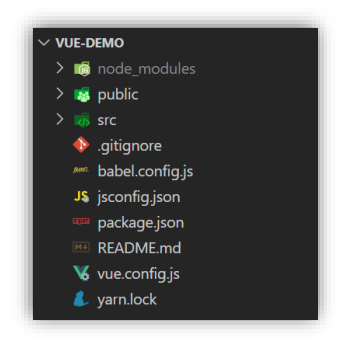
好处:
- 开箱即用,零配置
- 内置 babel 等工具(框架语法转基础三剑客语法,语法翻译、降级)
- 标准化
使用步骤:
- 全局安装 (一次性) :
yarn global add @vue/cli或npm i @vue/cli -g - 查看 Vue 版本:
vue --version - 创建项目架子:
vue create project-name(项目名-不能用中文) - 启动项目:
yarn serve或npm run serve(找package.json)
- 全局安装 (一次性) :
项目运行流程
VUE-DEMO
│─node_modules 第三包文件夹
├─public  放html文件的地方
│  ├─favicon.ico  网站图标
│  └─index.html  index.html 模板文件 ③
├─src  源代码目录 → 以后写代码的文件夹
│  └─assets  静态资源目录 → 存放图片、字体等
│  └─components  组件目录 → 存放通用组件
│  └─App.vue  App根组件 → 项目运行看到的内容就在这里编写 ②
│  └─main.js  入口文件 → 打包或运行,第一个执行的文件 ①
└─.gitignore  git忽视文件
└─babel.config.js  babel配置文件,语法翻译、降级,转基础三剑客
└─jsconfig.json  js配置文件,语法提示
└─package.json 项目配置文件 → 包含项目名、版本号、scripts、依赖包等
└─README.md  项目说明文档
└─vue.config.js  vue-cli配置文件
└─yarn.lock  yarn锁文件,由yarn自动生成的,锁定安装版本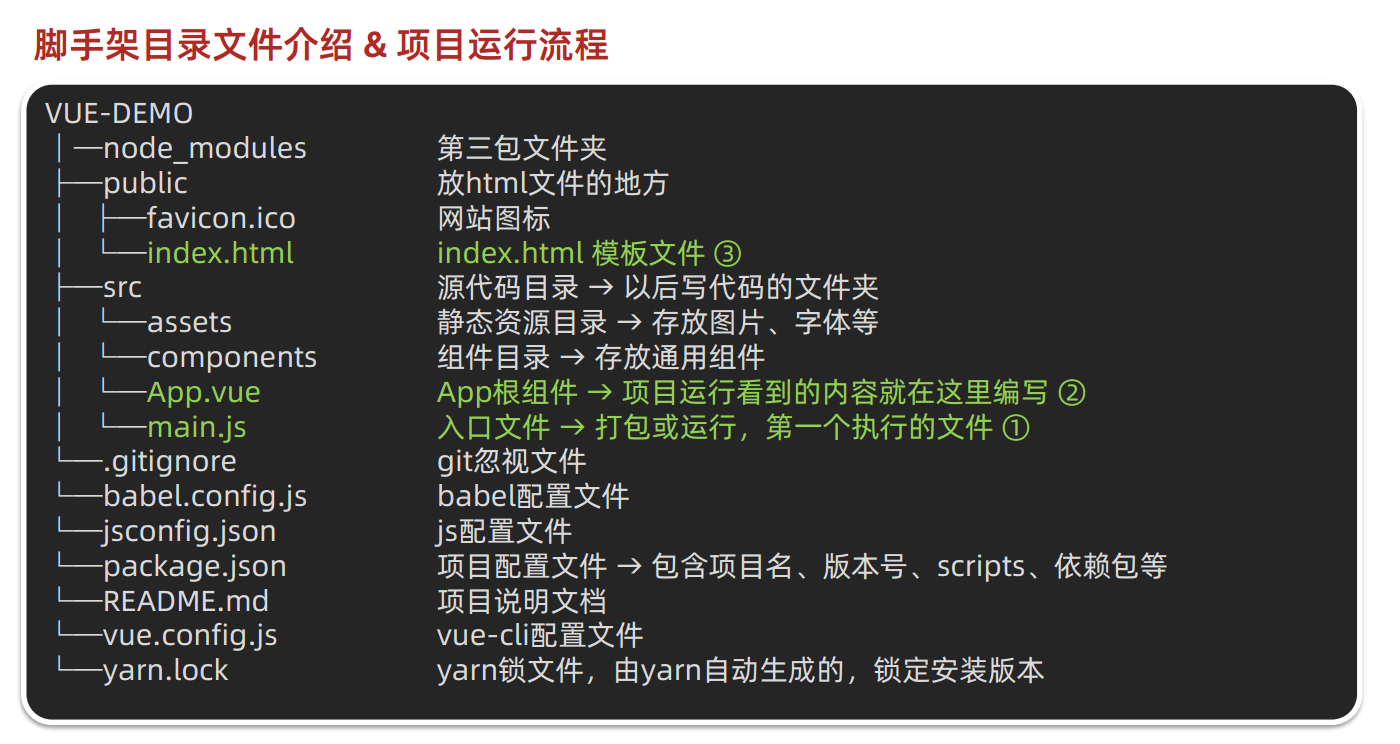
VUE-DEMO
├─public  放html文件的地方
│  └─index.html  index.html 模板文件 ③
├─src  源代码目录 → 以后写代码的文件夹
│  └─App.vue  App根组件 → 项目运行看到的内容就在这里编写 ②
│  └─main.js  入口文件 → 打包或运行,第一个执行的文件 ①
3个核心文件决定了项目运行
index.html模板文件结构分析
<!DOCTYPE html>
<html lang="">
  <head>
    <meta charset="utf-8">
    <meta http-equiv="X-UA-Compatible" content="IE=edge">
    <meta name="viewport" content="width=device-width,initial-scale=1.0">
    <link rel="icon" href="<%= BASE_URL %>favicon.ico">
    <title><%= htmlWebpackPlugin.options.title %></title>
  </head>
  <body>
    <!-- 兼容:给不支持js的浏览器一个提示 -->
    <noscript>
      <strong>We're sorry but <%= htmlWebpackPlugin.options.title %> doesn't work properly without JavaScript enabled. Please enable it to continue.</strong>
    </noscript>

    <!-- Vue所管理的容器:将来创建结构动态渲染这个容器 -->
    <div id="app">
      <!-- 工程化开发模式中:这里不再直接编写模板语法,通过 App.vue 提供结构渲染 -->
    </div>

    <!-- built files will be auto injected -->
  </body>
</html>
main.js入口文件结构分析
// 文件核心作用:导入App.vue,基于App.vue创建结构渲染index.html
// 1. 导入 Vue 核心包
import Vue from 'vue'

// 2. 导入 App.vue 根组件
import App from './App.vue'

// 提示:当前处于什么环境 (生产环境 / 开发环境)false时禁用,true时启用并打印当前环境
Vue.config.productionTip = false

// 3. Vue实例化,提供render方法 → 基于App.vue创建结构渲染index.html
new Vue({
  // el:指定vue所管理范围,如 el: '#app'为pubilc下的index.html的app容器
  // el: '#app',等同下方的.$mount('#app')方法,
  // 作用:和$mount('选择器')作用一致,用于指定Vue所管理容器

  // render方法:基于App.vue动态创建元素结构,
  // 简写:render: h => h(App),
  // 完整写法:函数,createElement创建元素结构,基于createElement(App)
  render: (createElement) => {
    // 基于App.vue动态创建元素结构
    return createElement(App)
  }
}).$mount('#app')
App.vue 根组件结构分析
<template>
  <div class="App">
    <div class="box" @click="fn"></div>
  </div>
</template>

<script>
// 导出的是当前组件的配置项
// 里面可以提供 data(特殊) methods computed watch 生命周期八大钩子
export default {
  created () {
    console.log('我是created')
  },
  methods: {
    fn () {
      alert('你好')
    }
  }
}
</script>

<style lang="less">
/* 让style支持less
   1. 给style加上 lang="less"
   2. 安装依赖包 less less-loader
      yarn add less less-loader -D (开发依赖)
*/
.App {
  width: 400px;
  height: 400px;
  background-color: pink;
  .box {
    width: 100px;
    height: 100px;
    background-color: skyblue;
  }
}
</style>- 项目实际的运行流程图:
- ①命令行中运行yarn serve,本质上是去执行main.js
- ②在main.js中:
- 导入了Vue
- 导入了App.vue根组件
- 实例化 Vue,将 App.vue 渲染到 index.html 容器中
- ③在main.js中,完成了App.vue的加载,最终渲染index.html
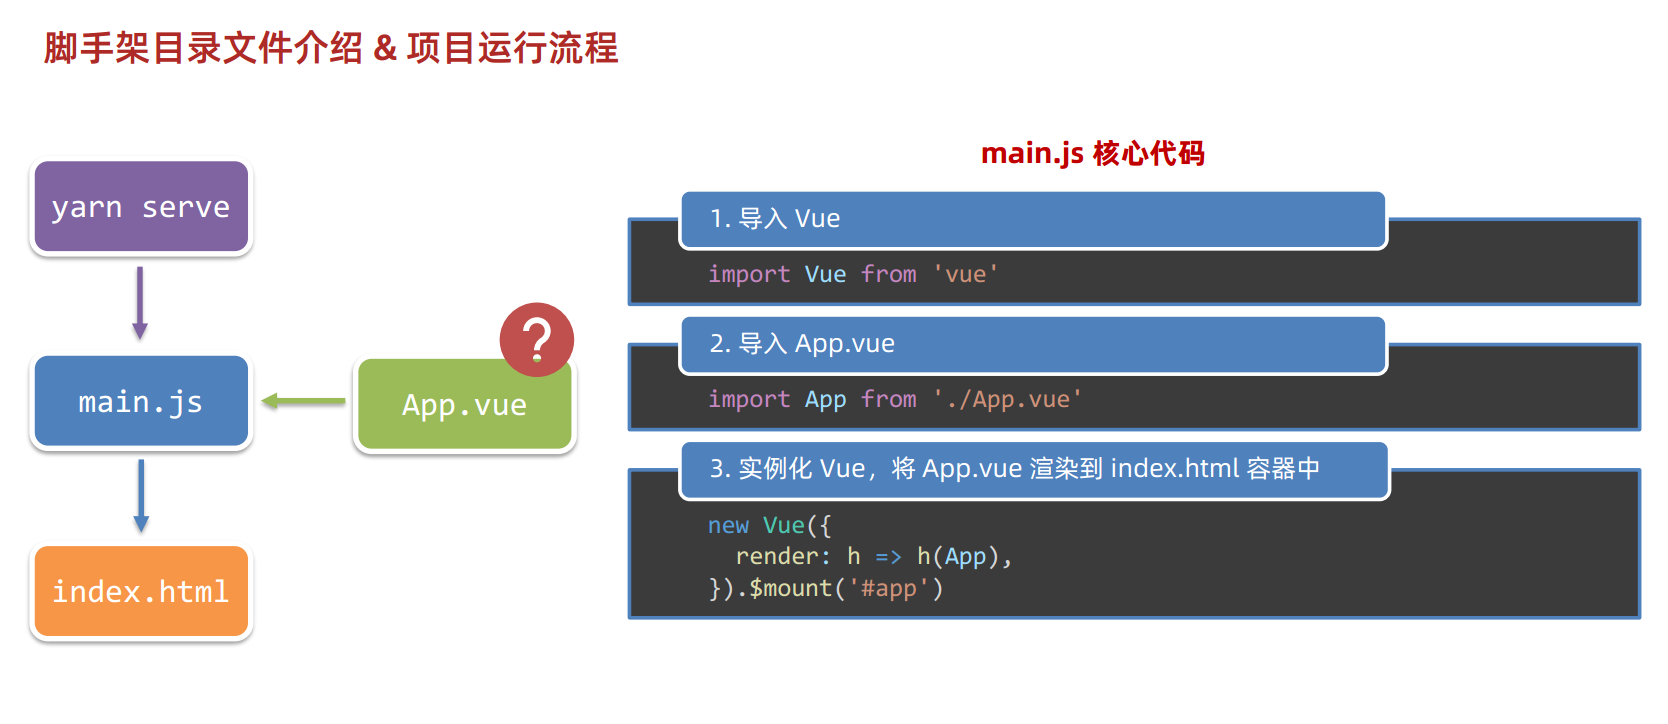
组件化开发
① 组件化:一个页面可以拆分成一个个组件,每个组件有着自己独立的结构、样式、行为。
- 好处:便于维护,利于复用 → 提升开发效率。
- 组件分类:普通组件、根组件。

② 根组件:整个应用最上层的组件,包裹所有普通小组件。
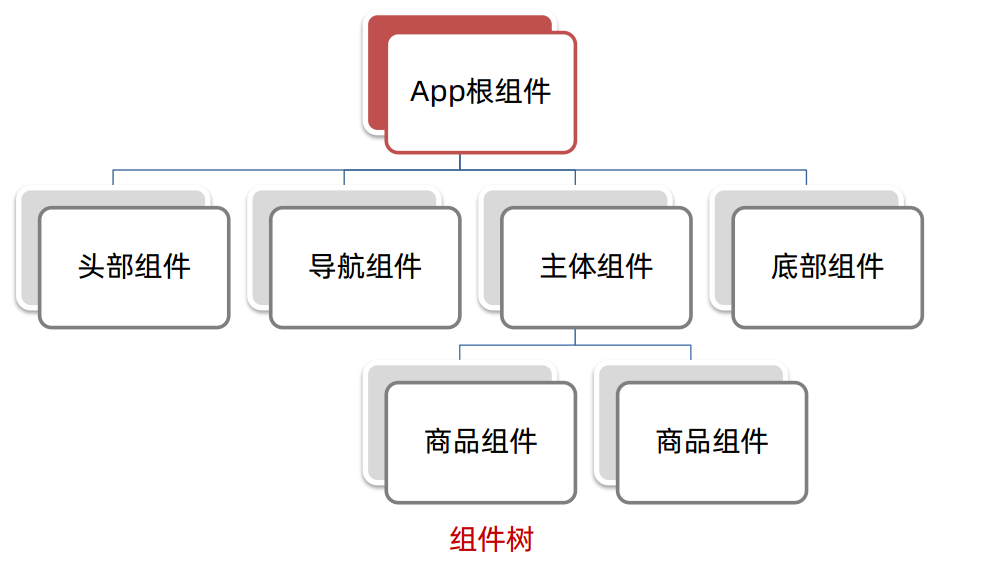
一个根组件App.vue,包含的三个部分:
- ① template 结构 (只能有一个根节点)
- ② style 样式 (可以支持less,需要装包 less 和 less-loader )
- ③ script 行为
典型根组件案例
<template>
  <div class="App">
    <div class="box" @click="fn"></div>
  </div>
</template>

<script>
// 导出的是当前组件的配置项
// 里面可以提供 data(特殊) methods computed watch 生命周期八大钩子
export default {
  created () {
    console.log('我是created')
  },
  methods: {
    fn () {
      alert('你好')
    }
  }
}
</script>

<style lang="less">
/* 让style支持less
   1. 给style加上 lang="less"
   2. 安装依赖包 less less-loader
      yarn add less less-loader -D (开发依赖)
*/
.App {
  width: 400px;
  height: 400px;
  background-color: pink;
  .box {
    width: 100px;
    height: 100px;
    background-color: skyblue;
  }
}
</style>
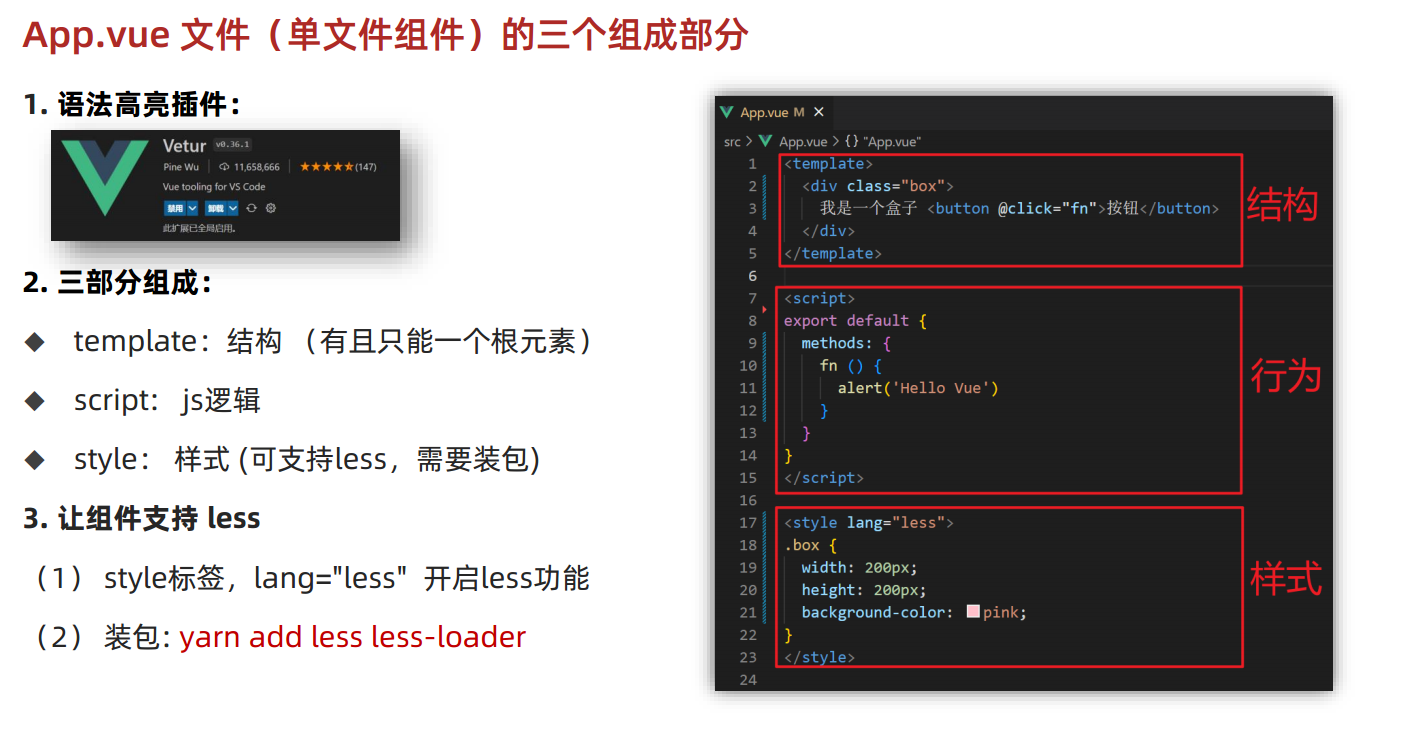
App.vue文件(单文件组件)的三大组成部分
- 语法高亮插件:
- 三部分组成:
- ◆ template:结构 (有且只能一个根元素)
- ◆ script: js逻辑
- ◆ style: 样式 (可支持less,需要装包)
- 让组件支持 less
- (1) style标签,lang="less" 开启less功能
- (2) 装包: yarn add less less-loader
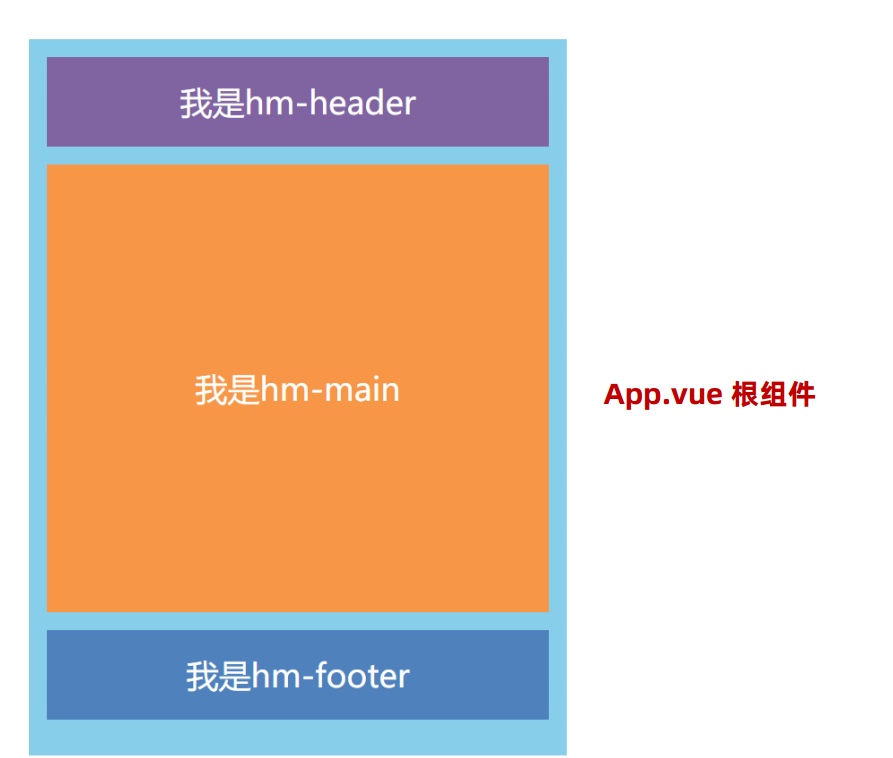
普通组件的注册使用
背景:App.vue根组件,包含三部分组成
组件注册的两种方式:
局部注册:只能在注册的组件内使用
- ① 创建 .vue 文件 (三个组成部分)
- ② 在使用的组件内导入并注册
全局注册:所有组件内都能使用
- ① 创建 .vue 文件 (三个组成部分)
- ② main.js 中进行全局注册
技巧:输入左尖括号
<vue>,Vscode有提示模板,回车引入组件注册与导入语法 App.vue
// 导入需要注册的组件
import 组件对象 from '.vue文件路径'
import HmHeader from './components/HmHeader'

export default {
  // 局部注册
  components: {
    '组件名': 组件对象,
    HmHeader: HmHeader
  }
}- 在src下的components路径下,局部注册3个组件,并导出
<template>
  <div class="hm-footer">
    我是hm-footer
  </div>
</template>

<script>
export default {

}
</script>

<style>
.hm-footer {
  height: 100px;
  line-height: 100px;
  text-align: center;
  font-size: 30px;
  background-color: #4f81bd;
  color: white;
}
</style><template>
<div class="hm-header">
我是hm-header
</div>
</template>
<script>
export default {
}
</script>
<style>
.hm-header {
height: 100px;
line-height: 100px;
text-align: center;
font-size: 30px;
background-color: #8064a2;
color: white;
}
</style><template>
<div class="hm-main">
我是hm-main
</div>
</template>
<script>
export default {
}
</script>
<style>
.hm-main {
height: 400px;
line-height: 400px;
text-align: center;
font-size: 30px;
background-color: #f79646;
color: white;
margin: 20px 0;
}
</style>组件的使用:
- ◆ 当成 html 标签使用
<组件名></组件名>
- ◆ 当成 html 标签使用
组件使用注意:
- ◆ 组件名规范 → 大驼峰命名法,如:HmHeader
组件使用技巧:
- ◆ 一般都用局部注册,如果发现确实是通用组件,再抽离,定义到全局。
导入局部注册的组件 App.vue
<template>
  <div class="App">
    <!-- 头部组件 -->
    <HmHeader></HmHeader>
    <!-- 主体组件 -->
    <HmMain></HmMain>
    <!-- 底部组件 -->
    <HmFooter></HmFooter>

    <!-- 如果 HmFooter + tab 出不来 → 需要配置 vscode
         设置中搜索 trigger on tab → 勾上
    -->
  </div>
</template>

<script>
import HmHeader from './components/HmHeader.vue'
import HmMain from './components/HmMain.vue'
import HmFooter from './components/HmFooter.vue'
export default {
  components: {
    // '组件名': 组件对象
    HmHeader: HmHeader,
    HmMain,
    HmFooter
  }
}
</script>

<style>
.App {
  width: 600px;
  height: 700px;
  background-color: #87ceeb;
  margin: 0 auto;
  padding: 20px;
}
</style>
背景:App.vue根组件,包含三部分组成
组件注册的两种方式:
局部注册:只能在注册的组件内使用
- ① 创建 .vue 文件 (三个组成部分)
- ② 在使用的组件内导入并注册
全局注册:所有组件内都能使用
- ① 创建 .vue 文件 (三个组成部分)
- ② main.js 中进行全局注册
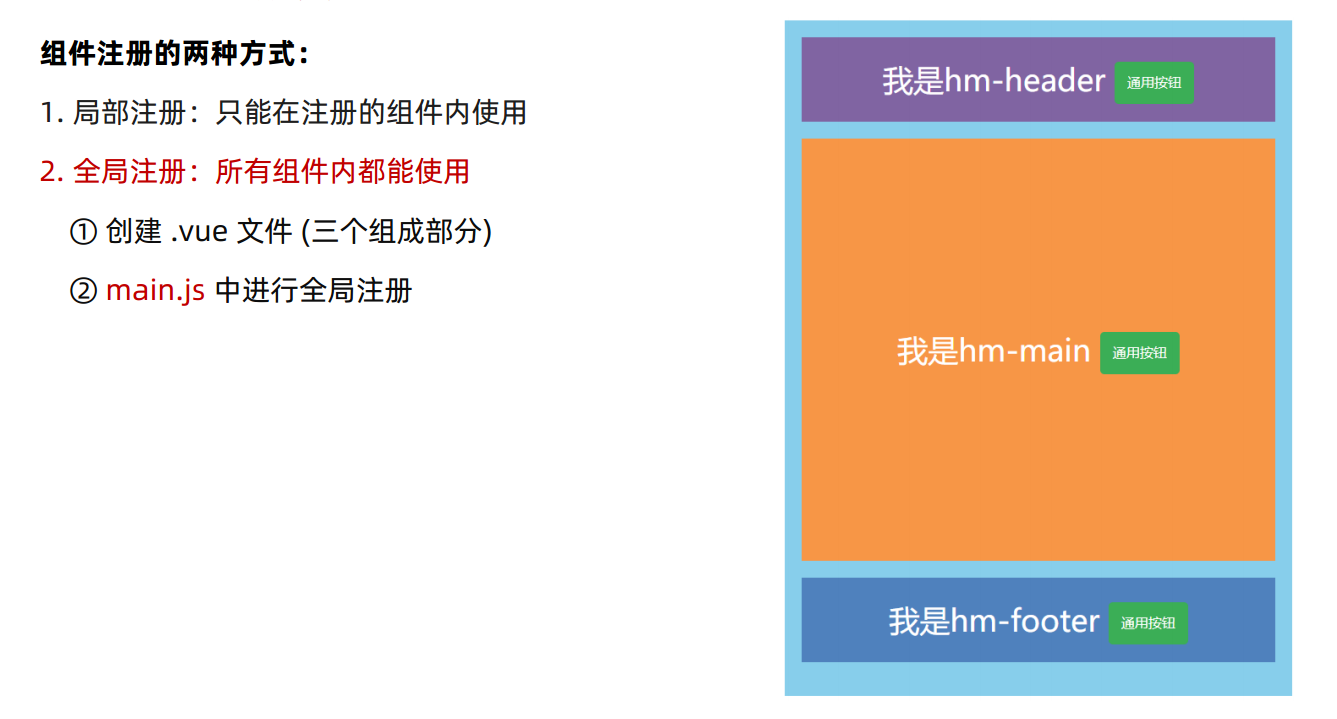
- 全局组件导入语法 main.js
// 导入需要全局注册的组件
import HmButton from './components/HmButton'
// 调用 Vue.component 进行全局注册
// Vue.component('组件名', 组件对象)
Vue.component('HmButton', HmButton)- 全局组件注册:在src下的components路径下,全局注册HmButton.vue组件,并导出
<template>
  <button class="hm-button">通用按钮</button>
</template>

<script>
export default {

}
</script>

<style>
.hm-button {
  height: 50px;
  line-height: 50px;
  padding: 0 20px;
  background-color: #3bae56;
  border-radius: 5px;
  color: white;
  border: none;
  vertical-align: middle;
  cursor: pointer;
}
</style>- 在main.js中,导入全局组件使用
// 文件核心作用:导入App.vue,基于App.vue创建结构渲染index.html
import Vue from 'vue'
import App from './App.vue'
// 编写导入的代码,往代码的顶部编写(规范)
import HmButton from './components/HmButton'
Vue.config.productionTip = false

// 进行全局注册 → 在所有的组件范围内都能直接使用
// Vue.component(组件名,组件对象)
Vue.component('HmButton', HmButton)


// Vue实例化,提供render方法 → 基于App.vue创建结构渲染index.html
new Vue({
  // render: h => h(App),
  render: (createElement) => {
    // 基于App创建元素结构
    return createElement(App)
  }
}).$mount('#app')- 全局组件注册完,每个组件都能使用
<template>
  <div class="hm-footer">
    我是hm-footer
    <HmButton></HmButton>
  </div>
</template>

<script>
export default {

}
</script>

<style>
.hm-footer {
  height: 100px;
  line-height: 100px;
  text-align: center;
  font-size: 30px;
  background-color: #4f81bd;
  color: white;
}
</style><template>
<div class="hm-header">
我是hm-header
<HmButton></HmButton>
</div>
</template>
<script>
// import HmButton from './HmButton.vue'
export default {
// 局部注册: 注册的组件只能在当前的组件范围内使用
// components: {
// HmButton
// }
}
</script>
<style>
.hm-header {
height: 100px;
line-height: 100px;
text-align: center;
font-size: 30px;
background-color: #8064a2;
color: white;
}
</style><template>
<div class="hm-main">
我是hm-main
<HmButton></HmButton>
</div>
</template>
<script>
export default {
}
</script>
<style>
.hm-main {
height: 400px;
line-height: 400px;
text-align: center;
font-size: 30px;
background-color: #f79646;
color: white;
margin: 20px 0;
}
</style>- 总结普通组件的注册使用:
- 两种注册方式:
- ① 局部注册:
- (1) 创建.vue组件 (单文件组件)
- (2) 使用的组件内导入,并局部注册
components: { 组件名:组件对象 }
- ② 全局注册:
- (1) 创建.vue组件 (单文件组件)
- (2) main.js内导入,并全局注册
Vue.component(组件名, 组件对象)
- 使用:
- 方法:
- 当成 html 标签使用
<组件名></组件名>
- 当成 html 标签使用
- 注意:
- 组件名规范 → 大驼峰命名法,如:HmHeader
- 技巧:
- 一般都用局部注册,如果发现确实是通用组件,再抽离到全局
- 方法:
综合案例 - 小兔鲜首页 - 组件拆分
页面静态结构开发思路:
- 分析页面,按模块拆分组件,搭架子 (局部或全局注册)
- 根据设计图,编写组件 html 结构 css 样式 (已准备好)
- 拆分封装通用小组件 (局部或全局注册)
将来 → 通过 js 动态渲染,实现功能
组件化拆分封装:
- 好处:按页面区块拆分,避免单一页面代码量过多,方便修改、复用
- 注意1:各组件在命名上,应注意要有区分特征,区分开全局组件和局部组件,例如通过前缀区分,可以使用驼峰命名
- 注意2:按模块划分好后,后续写的时候,专注于单个模块来编写逻辑即可
- 注意3:注意cv工程师-快捷键的使用
- 所有都折叠 ctrl + k , ctrl + 0
- 所有都展开 ctrl + k , ctrl + J
- shift+alt拖选区域/鼠标滚轮按住拖选区域,多行复制,多行回车,多行粘贴
- 注意4:注意cv工程师-通过浏览器调试,偷css样式代码使用
- 注意5:细化拆分组件,将局部组件再抽离一部分基础组件代码出来单独成为基础组件
- 观察html结构,多个li的地方,只保留一个,其他的通过v-for复用,例如抽离后的XtxNewGoods.vue和XtxHotBrand.vue
- 保留的单个li,就是我们需要封装的结构,例如下面的BaseGoodsItem.vue和BaseBrandItem.vue
- 注意连同css共用部分也作拆分抽离,例如下面的BaseGoodsItem.vue和BaseBrandItem.vue
- 多个类名在抽离后,合并使用单个抽离后的类名即可,例如.base-goods-item和.base-brand-item
拆分前效果
<template>
<div class="App">
<!-- 快捷链接 -->
<div class="shortcut">
<div class="wrapper">
<ul>
<li><a href="#" class="login">请先登录</a></li>
<li><a href="#">免费注册</a></li>
<li><a href="#">我的订单</a></li>
<li><a href="#">会员中心</a></li>
<li><a href="#">帮助中心</a></li>
<li><a href="#">在线客服</a></li>
<li>
<a href="#"
><span class="iconfont icon-mobile-phone"></span>手机版</a
>
</li>
</ul>
</div>
</div>
<!-- 头部导航 -->
<div class="header wrapper">
<!-- logo -->
<div class="logo">
<h1>
<a href="#">小兔鲜儿</a>
</h1>
</div>
<!-- 导航 -->
<div class="nav">
<ul>
<li><a href="#">首页</a></li>
<li><a href="#">生鲜</a></li>
<li><a href="#">美食</a></li>
<li><a href="#">餐厨</a></li>
<li><a href="#">电器</a></li>
<li><a href="#">居家</a></li>
<li><a href="#">洗护</a></li>
<li><a href="#">孕婴</a></li>
<li><a href="#">服装</a></li>
</ul>
</div>
<!-- 搜索 -->
<div class="search">
<span class="iconfont icon-search"></span>
<input type="text" placeholder="搜一搜" />
</div>
<!-- 购物车 -->
<div class="cart">
<span class="iconfont icon-cart-full"></span>
<i>2</i>
</div>
</div>
<!-- 轮播区域 -->
<div class="banner">
<div class="wrapper">
<!-- 图 -->
<ul class="pic">
<li>
<a href="#"><img src="@/assets/images/banner1.png" alt="" /></a>
</li>
<li>
<a href="#"><img src="@/assets/images/banner1.png" alt="" /></a>
</li>
</ul>
<!-- 侧导航 -->
<div class="subnav">
<ul>
<li>
<div>
<span><a href="#">生鲜</a></span>
<span><a href="#">水果</a><a href="#">蔬菜</a></span>
</div>
<i class="iconfont icon-arrow-right-bold"></i>
</li>
<li>
<div>
<span><a href="#">美食</a></span>
<span><a href="#">面点</a><a href="#">干果</a></span>
</div>
<i class="iconfont icon-arrow-right-bold"></i>
</li>
<li>
<div>
<span><a href="#">餐厨</a></span>
<span><a href="#">数码产品</a></span>
</div>
<i class="iconfont icon-arrow-right-bold"></i>
</li>
<li>
<div>
<span><a href="#">电器</a></span>
<span
><a href="#">床品</a><a href="#">四件套</a
><a href="#">被枕</a></span
>
</div>
<i class="iconfont icon-arrow-right-bold"></i>
</li>
<li>
<div>
<span><a href="#">居家</a></span>
<span
><a href="#">奶粉</a><a href="#">玩具</a
><a href="#">辅食</a></span
>
</div>
<i class="iconfont icon-arrow-right-bold"></i>
</li>
<li>
<div>
<span><a href="#">洗护</a></span>
<span
><a href="#">洗发</a><a href="#">洗护</a
><a href="#">美妆</a></span
>
</div>
<i class="iconfont icon-arrow-right-bold"></i>
</li>
<li>
<div>
<span><a href="#">孕婴</a></span>
<span><a href="#">奶粉</a><a href="#">玩具</a></span>
</div>
<i class="iconfont icon-arrow-right-bold"></i>
</li>
<li>
<div>
<span><a href="#">服饰</a></span>
<span><a href="#">女装</a><a href="#">男装</a></span>
</div>
<i class="iconfont icon-arrow-right-bold"></i>
</li>
<li>
<div>
<span><a href="#">杂货</a></span>
<span><a href="#">户外</a><a href="#">图书</a></span>
</div>
<i class="iconfont icon-arrow-right-bold"></i>
</li>
<li>
<div>
<span><a href="#">品牌</a></span>
<span><a href="#">品牌制造</a></span>
</div>
<i class="iconfont icon-arrow-right-bold"></i>
</li>
</ul>
</div>
<!-- 指示器 -->
<ol>
<li class="current"><i></i></li>
<li><i></i></li>
<li><i></i></li>
</ol>
</div>
</div>
<!-- 新鲜好物 -->
<div class="goods wrapper">
<div class="title">
<div class="left">
<h3>新鲜好物</h3>
<p>新鲜出炉 品质靠谱</p>
</div>
<div class="right">
<a href="#" class="more"
>查看全部<span class="iconfont icon-arrow-right-bold"></span
></a>
</div>
</div>
<div class="bd">
<ul>
<li>
<a href="#">
<div class="pic"><img src="@/assets/images/goods1.png" alt="" /></div>
<div class="txt">
<h4>KN95级莫兰迪色防护口罩</h4>
<p>¥ <span>79</span></p>
</div>
</a>
</li>
<li>
<a href="#">
<div class="pic"><img src="@/assets/images/goods2.png" alt="" /></div>
<div class="txt">
<h4>KN95级莫兰迪色防护口罩</h4>
<p>¥ <span>566</span></p>
</div>
</a>
</li>
<li>
<a href="#">
<div class="pic"><img src="@/assets/images/goods3.png" alt="" /></div>
<div class="txt">
<h4>法拉蒙高颜值记事本可定制</h4>
<p>¥ <span>58</span></p>
</div>
</a>
</li>
<li>
<a href="#">
<div class="pic"><img src="@/assets/images/goods4.png" alt="" /></div>
<div class="txt">
<h4>科技布布艺沙发</h4>
<p>¥ <span>3759</span></p>
</div>
</a>
</li>
</ul>
</div>
</div>
<!-- 热门品牌 -->
<div class="hot">
<div class="wrapper">
<div class="title">
<div class="left">
<h3>热门品牌</h3>
<p>国际经典 品质认证</p>
</div>
<div class="button">
<a href="#"><i class="iconfont icon-arrow-left-bold"></i></a>
<a href="#"><i class="iconfont icon-arrow-right-bold"></i></a>
</div>
</div>
<div class="bd">
<ul>
<li>
<a href="#">
<img src="@/assets/images/hot1.png" alt="" />
</a>
</li>
<li>
<a href="#">
<img src="@/assets/images/hot2.png" alt="" />
</a>
</li>
<li>
<a href="#">
<img src="@/assets/images/hot3.png" alt="" />
</a>
</li>
<li>
<a href="#">
<img src="@/assets/images/hot4.png" alt="" />
</a>
</li>
<li>
<a href="#">
<img src="@/assets/images/hot5.png" alt="" />
</a>
</li>
</ul>
</div>
</div>
</div>
<!-- 最新专题 -->
<div class="topic wrapper">
<div class="title">
<div class="left">
<h3>最新专题</h3>
</div>
<div class="right">
<a href="#" class="more"
>查看全部<span class="iconfont icon-arrow-right-bold"></span
></a>
</div>
</div>
<div class="topic_bd">
<ul>
<li>
<a href="#">
<div class="pic">
<img src="@/assets/images/topic1.png" alt="" />
<div class="info">
<div class="left">
<h5>吃这些美食才不算辜负自己</h5>
<p>餐厨起居洗护好物</p>
</div>
<div class="right">¥<span>29.9</span>起</div>
</div>
</div>
<div class="txt">
<div class="left">
<p>
<span class="iconfont icon-favorites-fill red"></span>
<i>1200</i>
</p>
<p>
<span class="iconfont icon-browse"></span>
<i>1800</i>
</p>
</div>
<div class="right">
<span class="iconfont icon-comment"></span>
<i>246</i>
</div>
</div>
</a>
</li>
<li>
<a href="#">
<div class="pic">
<img src="@/assets/images/topic2.png" alt="" />
<div class="info">
<div class="left">
<h5>吃这些美食才不算辜负自己</h5>
<p>餐厨起居洗护好物</p>
</div>
<div class="right">¥<span>29.9</span>起</div>
</div>
</div>
<div class="txt">
<div class="left">
<p>
<span class="iconfont icon-fabulous"></span>
<i>1200</i>
</p>
<p>
<span class="iconfont icon-browse"></span>
<i>1800</i>
</p>
</div>
<div class="right">
<span class="iconfont icon-comment"></span>
<i>246</i>
</div>
</div>
</a>
</li>
<li>
<a href="#">
<div class="pic">
<img src="@/assets/images/topic3.png" alt="" />
<div class="info">
<div class="left">
<h5>吃这些美食才不算辜负自己</h5>
<p>餐厨起居洗护好物</p>
</div>
<div class="right">¥<span>29.9</span>起</div>
</div>
</div>
<div class="txt">
<div class="left">
<p>
<span class="iconfont icon-fabulous"></span>
<i>1200</i>
</p>
<p>
<span class="iconfont icon-browse"></span>
<i>1800</i>
</p>
</div>
<div class="right">
<span class="iconfont icon-comment"></span>
<i>246</i>
</div>
</div>
</a>
</li>
</ul>
</div>
</div>
<!-- 版权底部 -->
<div class="footer">
<div class="wrapper">
<div class="service">
<ul>
<li>
<span></span>
<p>价格亲民</p>
</li>
<li>
<span></span>
<p>物流快捷</p>
</li>
<li>
<span></span>
<p>品质新鲜</p>
</li>
<li>
<span></span>
<p>售后无忧</p>
</li>
</ul>
</div>
<div class="help">
<div class="left">
<dl>
<dt>购物指南</dt>
<dd><a href="#">购物流程</a></dd>
<dd><a href="#">支付方式</a></dd>
<dd><a href="#">售后规则</a></dd>
</dl>
<dl>
<dt>配送方式</dt>
<dd><a href="#">配送运费</a></dd>
<dd><a href="#">配送范围</a></dd>
<dd><a href="#">配送时间</a></dd>
</dl>
<dl>
<dt>关于我们</dt>
<dd><a href="#">平台规则</a></dd>
<dd><a href="#">联系我们</a></dd>
<dd><a href="#">问题反馈</a></dd>
</dl>
<dl>
<dt>售后服务</dt>
<dd><a href="#">售后政策</a></dd>
<dd><a href="#">退款说明</a></dd>
<dd><a href="#">取消订单</a></dd>
</dl>
<dl>
<dt>服务热线</dt>
<dd>
<a href="#"
>在线客服<span class="iconfont icon-customer-service"></span
></a>
</dd>
<dd><a href="#">客服电话 400-0000-000</a></dd>
<dd><a href="#">工作时间 周一至周日 8:00-18:00</a></dd>
</dl>
</div>
<div class="right">
<ul>
<li>
<div><img src="@/assets/images/wechat.png" alt="" /></div>
<p>微信公众号</p>
</li>
<li>
<div><img src="@/assets/images/app.png" alt="" /></div>
<p>APP下载二维码</p>
</li>
</ul>
</div>
</div>
<div class="copyright">
<p>
<a href="#">关于我们</a>|<a href="#">帮助中心</a>|<a href="#"
>售后服务</a
>|<a href="#">配送与验收</a>|<a href="#">商务合作</a>|<a href="#"
>搜索推荐</a
>|<a href="#">友情链接</a>
</p>
<p>CopyRight © 小兔鲜</p>
</div>
</div>
</div>
</div>
</template>
<script>
export default {}
</script>
<style></style>/* 所有都折叠 ctrl + k , ctrl + 0 */
/* 所有都展开 ctrl + k , ctrl + J */
/* 快捷导航 */
.shortcut {
height: 52px;
line-height: 52px;
background-color: #333;
}
.shortcut .wrapper {
display: flex;
justify-content: flex-end;
}
.shortcut ul {
display: flex;
}
.shortcut a {
padding: 0 15px;
border-right: 1px solid #999;
color: #fff;
font-size: 14px;
line-height: 14px;
}
.shortcut .login {
color: #5EB69C;
}
.shortcut .icon-mobile-phone {
margin-right: 5px;
}
/* 头部导航 */
.header {
display: flex;
margin: 22px auto;
}
.header .logo {
margin-right: 40px;
width: 200px;
height: 88px;
background-color: pink;
}
.header .logo a {
display: block;
width: 200px;
height: 88px;
background-image: url(~@/assets/images/logo.png);
font-size: 0;
}
.header .nav {
margin-top: 33px;
margin-right: 27px;
}
.header .nav ul {
display: flex;
}
.header .nav li {
margin-right: 48px;
}
.header .nav a {
display: block;
height: 34px;
}
.header .nav a:hover {
border-bottom: 2px solid #5EB69C;
}
.header .search {
display: flex;
margin-right: 45px;
margin-top: 33px;
width: 170px;
height: 34px;
border-bottom: 2px solid #F4F4F4;
}
.header .search .icon-search {
margin-right: 8px;
font-size: 20px;
color: #999;
}
.header .search input {
flex: 1;
}
.header .search input::placeholder {
color: #ccc;
}
.header .cart {
position: relative;
margin-top: 33px;
}
.header .cart .icon-cart-full {
font-size: 24px;
}
.header .cart i {
position: absolute;
/* right: -5px; */
left: 15px;
top: 0;
padding: 0 5px;
height: 15px;
background-color: #E26237;
border-radius: 7px;
font-size: 12px;
color: #fffefe;
line-height: 15px;
}
/* 轮播区域 */
.banner {
height: 500px;
background-color: #F5F5F5 ;
}
.banner .wrapper {
position: relative;
overflow: hidden;
}
.banner .pic {
display: flex;
width: 3720px;
height: 500px;
}
.banner .pic li {
width: 1240px;
height: 500px;
}
.banner .subnav {
position: absolute;
left: 0;
top: 0;
width: 250px;
height: 500px;
background-color: rgba(0,0,0,0.42);
}
.banner .subnav li {
display: flex;
justify-content: space-between;
padding: 0 20px 0 30px;
height: 50px;
line-height: 50px;
}
.banner .subnav a,
.banner .subnav i {
color: #fff;
}
.banner .subnav li span:nth-child(1) {
margin-right: 14px;
}
.banner .subnav li span:nth-child(2) a {
margin-right: 5px;
}
.banner .subnav li span:nth-child(2) a {
font-size: 14px;
}
.banner .subnav li:hover {
background-color: #00BE9A;
}
.banner ol {
position: absolute;
right: 17px;
bottom: 17px;
display: flex;
}
.banner ol li {
cursor: pointer;
margin-left: 8px;
padding: 4px;
width: 22px;
height: 22px;
background-color: transparent;
border-radius: 50%;
}
.banner ol li i {
display: block;
width: 14px;
height: 14px;
background-color: rgba(255,255,255,0.5);
border-radius: 50%;
}
.banner ol .current {
background-color: rgba(255,255,255,0.5);
}
.banner ol .current i {
background-color: #fff;
}
/* 新鲜好物 */
.goods .bd ul {
display: flex;
justify-content: space-between;
}
.goods .bd li {
width: 304px;
height: 404px;
background-color: #EEF9F4;
}
.goods .bd li {
display: block;
}
.goods .bd li .pic {
width: 304px;
height: 304px;
}
.goods .bd li .txt {
text-align: center;
}
.goods .bd li h4 {
margin-top: 17px;
margin-bottom: 8px;
font-size: 20px;
}
.goods .bd li p {
font-size: 18px;
color: #AA2113;
}
.goods .bd li p span {
font-size: 22px;
}
/* 热门品牌 */
.hot {
margin-top: 60px;
padding-bottom: 40px;
overflow: hidden;
background-color: #F5F5F5;
}
.hot .title {
position: relative;
margin-bottom: 40px;
}
.hot .button {
display: flex;
position: absolute;
right: 0;
top: 47px;
}
.hot .button a {
display: block;
width: 20px;
height: 20px;
background-color: #ddd;
text-align: center;
line-height: 20px;
color: #fff;
}
.hot .button a:nth-child(2) {
margin-left: 12px;
background-color: #00BE9A;
}
.hot .bd ul {
display: flex;
justify-content: space-between;
}
.hot .bd li {
width: 244px;
height: 306px;
}
/* 最新专题 */
.topic {
padding-top: 60px;
margin-bottom: 40px;
}
.topic_bd ul {
display: flex;
justify-content: space-between;
}
.topic_bd li {
width: 405px;
height: 355px;
}
.topic_bd .pic {
position: relative;
width: 405px;
height: 288px;
}
.topic_bd .txt {
display: flex;
justify-content: space-between;
padding: 0 15px;
height: 67px;
line-height: 67px;
color: #666;
font-size: 14px;
}
.topic_bd .txt .left {
display: flex;
}
.topic_bd .txt .left p {
margin-right: 20px;
}
.topic_bd .txt .left .red {
color: #AA2113;
}
.topic_bd .info {
position: absolute;
left: 0;
bottom: 0;
display: flex;
justify-content: space-between;
padding: 0 15px;
width: 100%;
height: 90px;
background-image: linear-gradient(180deg, rgba(137,137,137,0.00) 0%, rgba(0,0,0,0.90) 100%);
}
.topic_bd .info .left {
padding-top: 20px;
color: #fff;
}
.topic_bd .info .left h5 {
margin-bottom: 5px;
font-size: 20px;
}
.topic_bd .info .right {
margin-top: 35px;
padding: 0 7px;
height: 25px;
line-height: 25px;
background-color: #fff;
color: #AA2113;
font-size: 15px;
}
/* 版权底部 */
.footer {
height: 580px;
background-color: #F5F5F5;
}
.footer .service {
padding: 60px 0;
height: 180px;
border-bottom: 1px solid #E8E8E8;
}
.footer .service ul {
display: flex;
justify-content: space-around;
}
.footer .service li {
display: flex;
line-height: 58px;
}
.footer .service span {
display: block;
margin-right: 20px;
width: 58px;
height: 58px;
background-image: url(~@/assets/images/sprite.png);
}
.footer .service li:nth-child(2) span {
background-position: 0 -58px;
}
.footer .service li:nth-child(3) span {
background-position: 0 -116px;
}
.footer .service li:nth-child(4) span {
background-position: 0 -174px;
}
.footer .service p {
font-size: 28px;
}
.footer .help {
display: flex;
justify-content: space-between;
margin-top: 60px;
}
.footer .help .left {
display: flex;
}
.footer .help .left dl {
margin-right: 84px;
}
.footer .help .left dt {
margin-bottom: 30px;
font-size: 18px;
}
.footer .help .left dd {
margin-bottom: 10px;
}
.footer .help .left dd a {
color: #969696;
}
.footer .help .right ul {
display: flex;
align-items: flex-start;
}
.footer .help .right li:nth-child(1) {
margin-right: 55px;
text-align: center;
}
.footer .help .right div {
margin-bottom: 10px;
width: 120px;
height: 120px;
color: #969696;
}
.icon-customer-service {
margin-left: 3px;
color: #00BE9A;
}
.copyright {
margin-top: 100px;
text-align: center;
color: #A1A1A1;
}
.copyright p {
margin-bottom: 15px;
}
.copyright a {
margin: 0 10px;
color: #A1A1A1;
}- 拆分后效果
import Vue from 'vue'
import App from './App.vue'
import './styles/base.css' // css 样式重置
import './styles/common.css' // 公共全局样式
import './assets/iconfont/iconfont.css' // 字体图标的样式

import BaseGoodsItem from './components/BaseGoodsItem'
import BaseBrandItem from './components/BaseBrandItem'
Vue.component('BaseGoodsItem', BaseGoodsItem)
Vue.component('BaseBrandItem', BaseBrandItem)

Vue.config.productionTip = false

new Vue({
  render: h => h(App),
}).$mount('#app')<template>
<div class="App">
<!-- 快捷链接 -->
<XtxShortCut></XtxShortCut>
<!-- 顶部导航 -->
<XtxHeaderNav></XtxHeaderNav>
<!-- 轮播区域 -->
<XtxBanner></XtxBanner>
<!-- 新鲜好物 -->
<XtxNewGoods></XtxNewGoods>
<!-- 热门品牌 -->
<XtxHotBrand></XtxHotBrand>
<!-- 最新专题 -->
<XtxTopic></XtxTopic>
<!-- 版权底部 -->
<XtxFooter></XtxFooter>
</div>
</template>
<script>
import XtxShortCut from './components/XtxShortCut.vue'
import XtxHeaderNav from './components/XtxHeaderNav.vue'
import XtxBanner from './components/XtxBanner.vue'
import XtxNewGoods from './components/XtxNewGoods.vue'
import XtxHotBrand from './components/XtxHotBrand.vue'
import XtxTopic from './components/XtxTopic.vue'
import XtxFooter from './components/XtxFooter.vue'
export default {
data () {
return {
count: 0
}
},
components: {
XtxShortCut,
XtxHeaderNav,
XtxBanner,
XtxNewGoods,
XtxHotBrand,
XtxTopic,
XtxFooter,
}
}
</script>
<style>
</style>/* 去除常见标签默认的 margin 和 padding */
* {
margin: 0;
padding: 0;
box-sizing: border-box;
}
/* 设置网页统一的字体大小、行高、字体系列相关属性 */
body {
font: 16px/1.5 "Microsoft Yahei",
"Hiragino Sans GB", "Heiti SC", "WenQuanYi Micro Hei", sans-serif;
color: #333;
}
/* 去除列表默认样式 */
ul,
ol {
list-style: none;
}
/* 去除默认的倾斜效果 */
em,
i {
font-style: normal;
}
/* 去除a标签默认下划线,并设置默认文字颜色 */
a {
text-decoration: none;
color: #333;
}
/* 设置img的垂直对齐方式为居中对齐,去除img默认下间隙 */
img {
width: 100%;
height: 100%;
vertical-align: middle;
}
/* 去除input默认样式 */
input {
border: none;
outline: none;
color: #333;
}
h1,
h2,
h3,
h4,
h5,
h6 {
font-weight: 400;
}
/* 双伪元素清除法 */
.clearfix::before,
.clearfix::after {
content: "";
display: table;
}
.clearfix::after {
clear: both;
}/* 公共的全局样式 */
.wrapper {
margin: 0 auto;
width: 1240px;
}
.title {
display: flex;
justify-content: space-between;
margin-top: 40px;
margin-bottom: 30px;
height: 42px;
}
.title .left {
display: flex;
align-items: flex-end;
}
.title .left h3 {
margin-right: 35px;
font-size: 30px;
}
.title .left p {
padding-bottom: 5px;
color: #A1A1A1;
}
.title .right {
line-height: 42px;
}
.title .right .more {
color: #A1A1A1;
}
.title .right .iconfont {
margin-left: 10px;
}<template>
<li class="base-brand-item">
<a href="#">
<img src="@/assets/images/hot1.png" alt="" />
</a>
</li>
</template>
<script>
export default {
}
</script>
<style>
.base-brand-item {
width: 244px;
height: 306px;
}
</style><template>
<li class="base-goods-item">
<a href="#">
<div class="pic">
<img src="@/assets/images/goods1.png" alt="" />
</div>
<div class="txt">
<h4>KN95级莫兰迪色防护口罩</h4>
<p>¥ <span>79</span></p>
</div>
</a>
</li>
</template>
<script>
export default {}
</script>
<style>
.base-goods-item {
width: 304px;
height: 404px;
background-color: #EEF9F4;
}
.base-goods-item {
display: block;
}
.base-goods-item .pic {
width: 304px;
height: 304px;
}
.base-goods-item .txt {
text-align: center;
}
.base-goods-item h4 {
margin-top: 17px;
margin-bottom: 8px;
font-size: 20px;
}
.base-goods-item p {
font-size: 18px;
color: #AA2113;
}
.base-goods-item p span {
font-size: 22px;
}
</style><template>
<!-- 轮播区域 -->
<div class="banner">
<div class="wrapper">
<!-- 图 -->
<ul class="pic">
<li>
<a href="#"><img src="@/assets/images/banner1.png" alt="" /></a>
</li>
<li>
<a href="#"><img src="@/assets/images/banner1.png" alt="" /></a>
</li>
</ul>
<!-- 侧导航 -->
<div class="subnav">
<ul>
<li>
<div>
<span><a href="#">生鲜</a></span>
<span><a href="#">水果</a><a href="#">蔬菜</a></span>
</div>
<i class="iconfont icon-arrow-right-bold"></i>
</li>
<li>
<div>
<span><a href="#">美食</a></span>
<span><a href="#">面点</a><a href="#">干果</a></span>
</div>
<i class="iconfont icon-arrow-right-bold"></i>
</li>
<li>
<div>
<span><a href="#">餐厨</a></span>
<span><a href="#">数码产品</a></span>
</div>
<i class="iconfont icon-arrow-right-bold"></i>
</li>
<li>
<div>
<span><a href="#">电器</a></span>
<span
><a href="#">床品</a><a href="#">四件套</a
><a href="#">被枕</a></span
>
</div>
<i class="iconfont icon-arrow-right-bold"></i>
</li>
<li>
<div>
<span><a href="#">居家</a></span>
<span
><a href="#">奶粉</a><a href="#">玩具</a
><a href="#">辅食</a></span
>
</div>
<i class="iconfont icon-arrow-right-bold"></i>
</li>
<li>
<div>
<span><a href="#">洗护</a></span>
<span
><a href="#">洗发</a><a href="#">洗护</a
><a href="#">美妆</a></span
>
</div>
<i class="iconfont icon-arrow-right-bold"></i>
</li>
<li>
<div>
<span><a href="#">孕婴</a></span>
<span><a href="#">奶粉</a><a href="#">玩具</a></span>
</div>
<i class="iconfont icon-arrow-right-bold"></i>
</li>
<li>
<div>
<span><a href="#">服饰</a></span>
<span><a href="#">女装</a><a href="#">男装</a></span>
</div>
<i class="iconfont icon-arrow-right-bold"></i>
</li>
<li>
<div>
<span><a href="#">杂货</a></span>
<span><a href="#">户外</a><a href="#">图书</a></span>
</div>
<i class="iconfont icon-arrow-right-bold"></i>
</li>
<li>
<div>
<span><a href="#">品牌</a></span>
<span><a href="#">品牌制造</a></span>
</div>
<i class="iconfont icon-arrow-right-bold"></i>
</li>
</ul>
</div>
<!-- 指示器 -->
<ol>
<li class="current"><i></i></li>
<li><i></i></li>
<li><i></i></li>
</ol>
</div>
</div>
</template>
<script>
export default {}
</script>
<style>
/* 轮播区域 */
.banner {
height: 500px;
background-color: #F5F5F5 ;
}
.banner .wrapper {
position: relative;
overflow: hidden;
}
.banner .pic {
display: flex;
width: 3720px;
height: 500px;
}
.banner .pic li {
width: 1240px;
height: 500px;
}
.banner .subnav {
position: absolute;
left: 0;
top: 0;
width: 250px;
height: 500px;
background-color: rgba(0,0,0,0.42);
}
.banner .subnav li {
display: flex;
justify-content: space-between;
padding: 0 20px 0 30px;
height: 50px;
line-height: 50px;
}
.banner .subnav a,
.banner .subnav i {
color: #fff;
}
.banner .subnav li span:nth-child(1) {
margin-right: 14px;
}
.banner .subnav li span:nth-child(2) a {
margin-right: 5px;
}
.banner .subnav li span:nth-child(2) a {
font-size: 14px;
}
.banner .subnav li:hover {
background-color: #00BE9A;
}
.banner ol {
position: absolute;
right: 17px;
bottom: 17px;
display: flex;
}
.banner ol li {
cursor: pointer;
margin-left: 8px;
padding: 4px;
width: 22px;
height: 22px;
background-color: transparent;
border-radius: 50%;
}
.banner ol li i {
display: block;
width: 14px;
height: 14px;
background-color: rgba(255,255,255,0.5);
border-radius: 50%;
}
.banner ol .current {
background-color: rgba(255,255,255,0.5);
}
.banner ol .current i {
background-color: #fff;
}
</style><template>
<!-- 版权底部 -->
<div class="footer">
<div class="wrapper">
<div class="service">
<ul>
<li>
<span></span>
<p>价格亲民</p>
</li>
<li>
<span></span>
<p>物流快捷</p>
</li>
<li>
<span></span>
<p>品质新鲜</p>
</li>
<li>
<span></span>
<p>售后无忧</p>
</li>
</ul>
</div>
<div class="help">
<div class="left">
<dl>
<dt>购物指南</dt>
<dd><a href="#">购物流程</a></dd>
<dd><a href="#">支付方式</a></dd>
<dd><a href="#">售后规则</a></dd>
</dl>
<dl>
<dt>配送方式</dt>
<dd><a href="#">配送运费</a></dd>
<dd><a href="#">配送范围</a></dd>
<dd><a href="#">配送时间</a></dd>
</dl>
<dl>
<dt>关于我们</dt>
<dd><a href="#">平台规则</a></dd>
<dd><a href="#">联系我们</a></dd>
<dd><a href="#">问题反馈</a></dd>
</dl>
<dl>
<dt>售后服务</dt>
<dd><a href="#">售后政策</a></dd>
<dd><a href="#">退款说明</a></dd>
<dd><a href="#">取消订单</a></dd>
</dl>
<dl>
<dt>服务热线</dt>
<dd>
<a href="#"
>在线客服<span class="iconfont icon-customer-service"></span
></a>
</dd>
<dd><a href="#">客服电话 400-0000-000</a></dd>
<dd><a href="#">工作时间 周一至周日 8:00-18:00</a></dd>
</dl>
</div>
<div class="right">
<ul>
<li>
<div><img src="@/assets/images/wechat.png" alt="" /></div>
<p>微信公众号</p>
</li>
<li>
<div><img src="@/assets/images/app.png" alt="" /></div>
<p>APP下载二维码</p>
</li>
</ul>
</div>
</div>
<div class="copyright">
<p>
<a href="#">关于我们</a>|<a href="#">帮助中心</a>|<a href="#"
>售后服务</a
>|<a href="#">配送与验收</a>|<a href="#">商务合作</a>|<a href="#"
>搜索推荐</a
>|<a href="#">友情链接</a>
</p>
<p>CopyRight © 小兔鲜</p>
</div>
</div>
</div>
</template>
<script>
export default {}
</script>
<style>
/* 版权底部 */
.footer {
height: 580px;
background-color: #f5f5f5;
}
.footer .service {
padding: 60px 0;
height: 180px;
border-bottom: 1px solid #e8e8e8;
}
.footer .service ul {
display: flex;
justify-content: space-around;
}
.footer .service li {
display: flex;
line-height: 58px;
}
.footer .service span {
display: block;
margin-right: 20px;
width: 58px;
height: 58px;
background-image: url(~@/assets/images/sprite.png);
}
.footer .service li:nth-child(2) span {
background-position: 0 -58px;
}
.footer .service li:nth-child(3) span {
background-position: 0 -116px;
}
.footer .service li:nth-child(4) span {
background-position: 0 -174px;
}
.footer .service p {
font-size: 28px;
}
.footer .help {
display: flex;
justify-content: space-between;
margin-top: 60px;
}
.footer .help .left {
display: flex;
}
.footer .help .left dl {
margin-right: 84px;
}
.footer .help .left dt {
margin-bottom: 30px;
font-size: 18px;
}
.footer .help .left dd {
margin-bottom: 10px;
}
.footer .help .left dd a {
color: #969696;
}
.footer .help .right ul {
display: flex;
align-items: flex-start;
}
.footer .help .right li:nth-child(1) {
margin-right: 55px;
text-align: center;
}
.footer .help .right div {
margin-bottom: 10px;
width: 120px;
height: 120px;
color: #969696;
}
.icon-customer-service {
margin-left: 3px;
color: #00be9a;
}
.copyright {
margin-top: 100px;
text-align: center;
color: #a1a1a1;
}
.copyright p {
margin-bottom: 15px;
}
.copyright a {
margin: 0 10px;
color: #a1a1a1;
}
</style><template>
<!-- 头部导航 -->
<div class="header wrapper">
<!-- logo -->
<div class="logo">
<h1>
<a href="#">小兔鲜儿</a>
</h1>
</div>
<!-- 导航 -->
<div class="nav">
<ul>
<li><a href="#">首页</a></li>
<li><a href="#">生鲜</a></li>
<li><a href="#">美食</a></li>
<li><a href="#">餐厨</a></li>
<li><a href="#">电器</a></li>
<li><a href="#">居家</a></li>
<li><a href="#">洗护</a></li>
<li><a href="#">孕婴</a></li>
<li><a href="#">服装</a></li>
</ul>
</div>
<!-- 搜索 -->
<div class="search">
<span class="iconfont icon-search"></span>
<input type="text" placeholder="搜一搜" />
</div>
<!-- 购物车 -->
<div class="cart">
<span class="iconfont icon-cart-full"></span>
<i>2</i>
</div>
</div>
</template>
<script>
export default {
}
</script>
<style>
/* 头部导航 */
.header {
display: flex;
margin: 22px auto;
}
.header .logo {
margin-right: 40px;
width: 200px;
height: 88px;
background-color: pink;
}
.header .logo a {
display: block;
width: 200px;
height: 88px;
background-image: url(~@/assets/images/logo.png);
font-size: 0;
}
.header .nav {
margin-top: 33px;
margin-right: 27px;
}
.header .nav ul {
display: flex;
}
.header .nav li {
margin-right: 48px;
}
.header .nav a {
display: block;
height: 34px;
}
.header .nav a:hover {
border-bottom: 2px solid #5EB69C;
}
.header .search {
display: flex;
margin-right: 45px;
margin-top: 33px;
width: 170px;
height: 34px;
border-bottom: 2px solid #F4F4F4;
}
.header .search .icon-search {
margin-right: 8px;
font-size: 20px;
color: #999;
}
.header .search input {
flex: 1;
}
.header .search input::placeholder {
color: #ccc;
}
.header .cart {
position: relative;
margin-top: 33px;
}
.header .cart .icon-cart-full {
font-size: 24px;
}
.header .cart i {
position: absolute;
/* right: -5px; */
left: 15px;
top: 0;
padding: 0 5px;
height: 15px;
background-color: #E26237;
border-radius: 7px;
font-size: 12px;
color: #fffefe;
line-height: 15px;
}
</style><template>
<!-- 热门品牌 -->
<div class="hot">
<div class="wrapper">
<div class="title">
<div class="left">
<h3>热门品牌</h3>
<p>国际经典 品质认证</p>
</div>
<div class="button">
<a href="#"><i class="iconfont icon-arrow-left-bold"></i></a>
<a href="#"><i class="iconfont icon-arrow-right-bold"></i></a>
</div>
</div>
<div class="bd">
<ul>
<BaseBrandItem v-for="item in 5" :key="item"></BaseBrandItem>
</ul>
</div>
</div>
</div>
</template>
<script>
export default {}
</script>
<style>
/* 热门品牌 */
.hot {
margin-top: 60px;
padding-bottom: 40px;
overflow: hidden;
background-color: #F5F5F5;
}
.hot .title {
position: relative;
margin-bottom: 40px;
}
.hot .button {
display: flex;
position: absolute;
right: 0;
top: 47px;
}
.hot .button a {
display: block;
width: 20px;
height: 20px;
background-color: #ddd;
text-align: center;
line-height: 20px;
color: #fff;
}
.hot .button a:nth-child(2) {
margin-left: 12px;
background-color: #00BE9A;
}
.hot .bd ul {
display: flex;
justify-content: space-between;
}
</style><template>
<!-- 新鲜好物 -->
<div class="goods wrapper">
<div class="title">
<div class="left">
<h3>新鲜好物</h3>
<p>新鲜出炉 品质靠谱</p>
</div>
<div class="right">
<a href="#" class="more"
>查看全部<span class="iconfont icon-arrow-right-bold"></span
></a>
</div>
</div>
<div class="bd">
<ul>
<BaseGoodsItem></BaseGoodsItem>
<BaseGoodsItem></BaseGoodsItem>
<BaseGoodsItem></BaseGoodsItem>
<BaseGoodsItem></BaseGoodsItem>
</ul>
</div>
</div>
</template>
<script>
export default {}
</script>
<style>
/* 新鲜好物 */
.goods .bd ul {
display: flex;
justify-content: space-between;
}
</style><template>
<!-- 快捷链接 -->
<div class="shortcut">
<div class="wrapper">
<ul>
<li><a href="#" class="login">请先登录</a></li>
<li><a href="#">免费注册</a></li>
<li><a href="#">我的订单</a></li>
<li><a href="#">会员中心</a></li>
<li><a href="#">帮助中心</a></li>
<li><a href="#">在线客服</a></li>
<li>
<a href="#"
><span class="iconfont icon-mobile-phone"></span>手机版</a
>
</li>
</ul>
</div>
</div>
</template>
<script>
export default {
}
</script>
<style>
/* 快捷导航 */
.shortcut {
height: 52px;
line-height: 52px;
background-color: #333;
}
.shortcut .wrapper {
display: flex;
justify-content: flex-end;
}
.shortcut ul {
display: flex;
}
.shortcut a {
padding: 0 15px;
border-right: 1px solid #999;
color: #fff;
font-size: 14px;
line-height: 14px;
}
.shortcut .login {
color: #5EB69C;
}
.shortcut .icon-mobile-phone {
margin-right: 5px;
}
</style><template>
<!-- 最新专题 -->
<div class="topic wrapper">
<div class="title">
<div class="left">
<h3>最新专题</h3>
</div>
<div class="right">
<a href="#" class="more"
>查看全部<span class="iconfont icon-arrow-right-bold"></span
></a>
</div>
</div>
<div class="topic_bd">
<ul>
<li>
<a href="#">
<div class="pic">
<img src="@/assets/images/topic1.png" alt="" />
<div class="info">
<div class="left">
<h5>吃这些美食才不算辜负自己</h5>
<p>餐厨起居洗护好物</p>
</div>
<div class="right">¥<span>29.9</span>起</div>
</div>
</div>
<div class="txt">
<div class="left">
<p>
<span class="iconfont icon-favorites-fill red"></span>
<i>1200</i>
</p>
<p>
<span class="iconfont icon-browse"></span>
<i>1800</i>
</p>
</div>
<div class="right">
<span class="iconfont icon-comment"></span>
<i>246</i>
</div>
</div>
</a>
</li>
<li>
<a href="#">
<div class="pic">
<img src="@/assets/images/topic2.png" alt="" />
<div class="info">
<div class="left">
<h5>吃这些美食才不算辜负自己</h5>
<p>餐厨起居洗护好物</p>
</div>
<div class="right">¥<span>29.9</span>起</div>
</div>
</div>
<div class="txt">
<div class="left">
<p>
<span class="iconfont icon-fabulous"></span>
<i>1200</i>
</p>
<p>
<span class="iconfont icon-browse"></span>
<i>1800</i>
</p>
</div>
<div class="right">
<span class="iconfont icon-comment"></span>
<i>246</i>
</div>
</div>
</a>
</li>
<li>
<a href="#">
<div class="pic">
<img src="@/assets/images/topic3.png" alt="" />
<div class="info">
<div class="left">
<h5>吃这些美食才不算辜负自己</h5>
<p>餐厨起居洗护好物</p>
</div>
<div class="right">¥<span>29.9</span>起</div>
</div>
</div>
<div class="txt">
<div class="left">
<p>
<span class="iconfont icon-fabulous"></span>
<i>1200</i>
</p>
<p>
<span class="iconfont icon-browse"></span>
<i>1800</i>
</p>
</div>
<div class="right">
<span class="iconfont icon-comment"></span>
<i>246</i>
</div>
</div>
</a>
</li>
</ul>
</div>
</div>
</template>
<script>
export default {
}
</script>
<style>
/* 最新专题 */
.topic {
padding-top: 60px;
margin-bottom: 40px;
}
.topic_bd ul {
display: flex;
justify-content: space-between;
}
.topic_bd li {
width: 405px;
height: 355px;
}
.topic_bd .pic {
position: relative;
width: 405px;
height: 288px;
}
.topic_bd .txt {
display: flex;
justify-content: space-between;
padding: 0 15px;
height: 67px;
line-height: 67px;
color: #666;
font-size: 14px;
}
.topic_bd .txt .left {
display: flex;
}
.topic_bd .txt .left p {
margin-right: 20px;
}
.topic_bd .txt .left .red {
color: #AA2113;
}
.topic_bd .info {
position: absolute;
left: 0;
bottom: 0;
display: flex;
justify-content: space-between;
padding: 0 15px;
width: 100%;
height: 90px;
background-image: linear-gradient(180deg, rgba(137,137,137,0.00) 0%, rgba(0,0,0,0.90) 100%);
}
.topic_bd .info .left {
padding-top: 20px;
color: #fff;
}
.topic_bd .info .left h5 {
margin-bottom: 5px;
font-size: 20px;
}
.topic_bd .info .right {
margin-top: 35px;
padding: 0 7px;
height: 25px;
line-height: 25px;
background-color: #fff;
color: #AA2113;
font-size: 15px;
}
</style>组件的三大组成部分 - 注意点说明
- 结构
<template>:有且只能有一个根元素 - 样式
<style>:默认全局样式,加上 scoped 局部样式属性 - 逻辑
<script>:el是根实例独有属性,data是一个函数,保证数据独立,其他配置项一致。
组件的样式冲突 scoped
- 默认情况:组件与组件之间是会有样式冲突的
- 原因:写在组件中的样式,默认会 全局生效 →
- 导致:因此很容易造成多个组件之间的样式冲突问题
- 全局样式: 默认组件中的样式会作用到全局
- 局部样式: 可以给组件加上 scoped 属性, 可以让样式只作用于当前组件
- scoped原理?
- 当前组件内标签都被添加 data-v-hash值 的属性
- css选择器都被添加
[data-v-hash值]的属性选择器
- 最终效果: 必须是当前组件的元素, 才会有这个自定义属性, 才会被这个样式作用到
<template>
  <div id="app">
    <BaseOne></BaseOne>
    <BaseTwo></BaseTwo>
  </div>
</template>

<script>
import BaseOne from './components/BaseOne'
import BaseTwo from './components/BaseTwo'
export default {
  name: 'App',
  components: {
    BaseOne,
    BaseTwo
  }
}
</script><template>
<div class="base-one">
BaseOne
</div>
</template>
<script>
export default {
}
</script>
<style scoped>
/*
1.style中的样式 默认是作用到全局的
2.加上scoped可以让样式变成局部样式
组件都应该有独立的样式,推荐加scoped(原理)
-----------------------------------------------------
scoped原理:
1.给当前组件模板的所有元素,都会添加上一个自定义属性
data-v-hash值
data-v-5f6a9d56 用于区分开不通的组件
2.css选择器后面,被自动处理,添加上了属性选择器
div[data-v-5f6a9d56]
*/
div{
border: 3px solid blue;
margin: 30px;
}
</style><template>
<div class="base-one">
BaseTwo
</div>
</template>
<script>
export default {
}
</script>
<style scoped>
div{
border: 3px solid red;
margin: 30px;
}
</style>data 是一个函数
组件的逻辑 与 Vue根实例提供的数据逻辑 存在差异
- 根实例下的 data 可以是一个对象,直接提供数据
- 一个组件的 data 选项必须是一个函数。
- 目的:保证每个组件实例,维护独立的一份数据对象,确保在组件复用的时候,各个组件数据独立。
意义:
- 每次创建新的组件实例,都会新执行一次 data 函数,得到一个新对象
- 保证每个组件实例,维护独立的一份数据对象
- 确保在组件复用的时候,各个组件数据独立
<template>
  <div class="app">
    <baseCount></baseCount>
    <baseCount></baseCount>
    <baseCount></baseCount>
  </div>
</template>

<script>
import baseCount from './components/BaseCount'
export default {
  components: {
    baseCount,
  },
}
</script>

<style>
</style><template>
<div class="base-count">
<button @click="count--">-</button>
<span>{{ count }}</span>
<button @click="count++">+</button>
</div>
</template>
<script>
export default {
// data() {
// console.log('函数执行了')
// return {
// count: 100,
// }
// },
data: function () {
return {
count: 100,
}
},
}
</script>
<style>
.base-count {
margin: 20px;
}
</style>组件通信
背景:
- 由于每个组件下的数据逻辑 data 选项是一个独立的函数,是一个独立的新对象
定义:什么是组件通信?
- 组件通信, 就是指 组件与组件 之间的数据传递
⚫ 组件的数据是独立的,无法直接访问其他组件的数据。
⚫ 想用其他组件的数据 → 组件通信
思考:
- 组件之间有哪些关系?
- 对应的组件通信方案有哪几类?
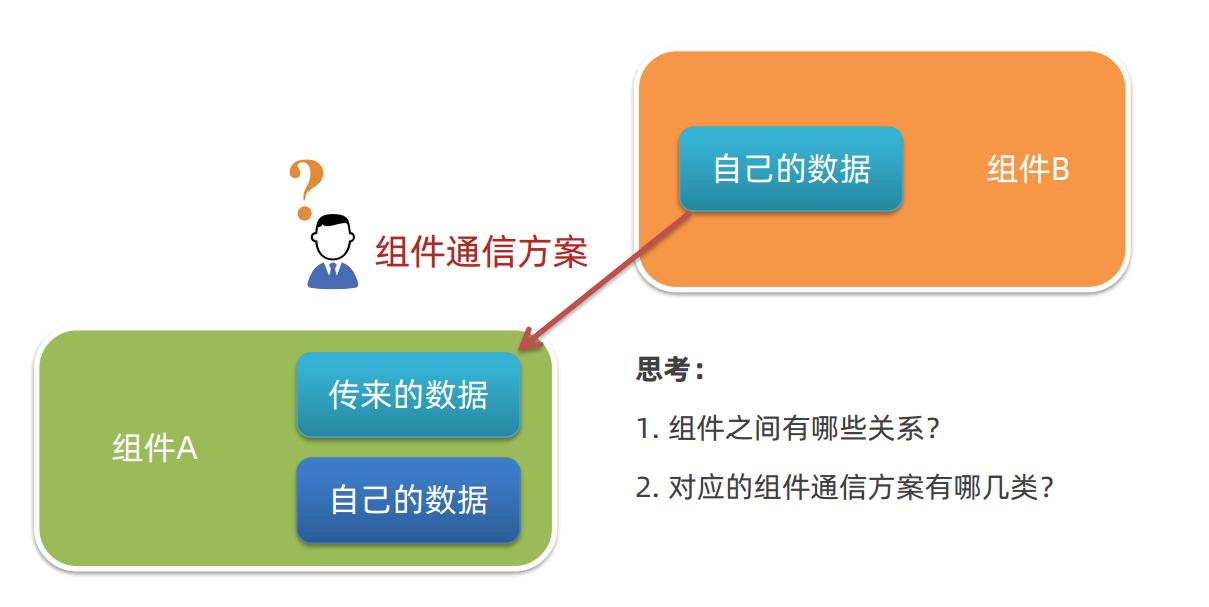
不同的组件关系 和 组件通信方案分类
- 组件关系分类:
- 父子关系
- 非父子关系
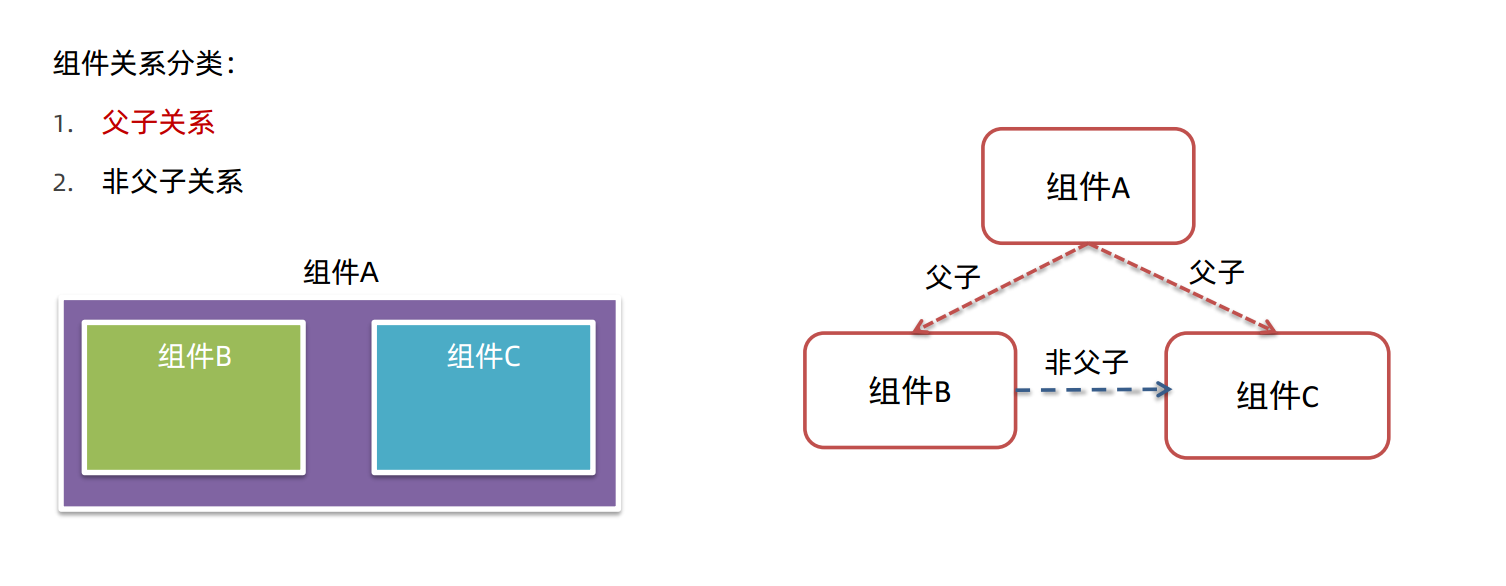
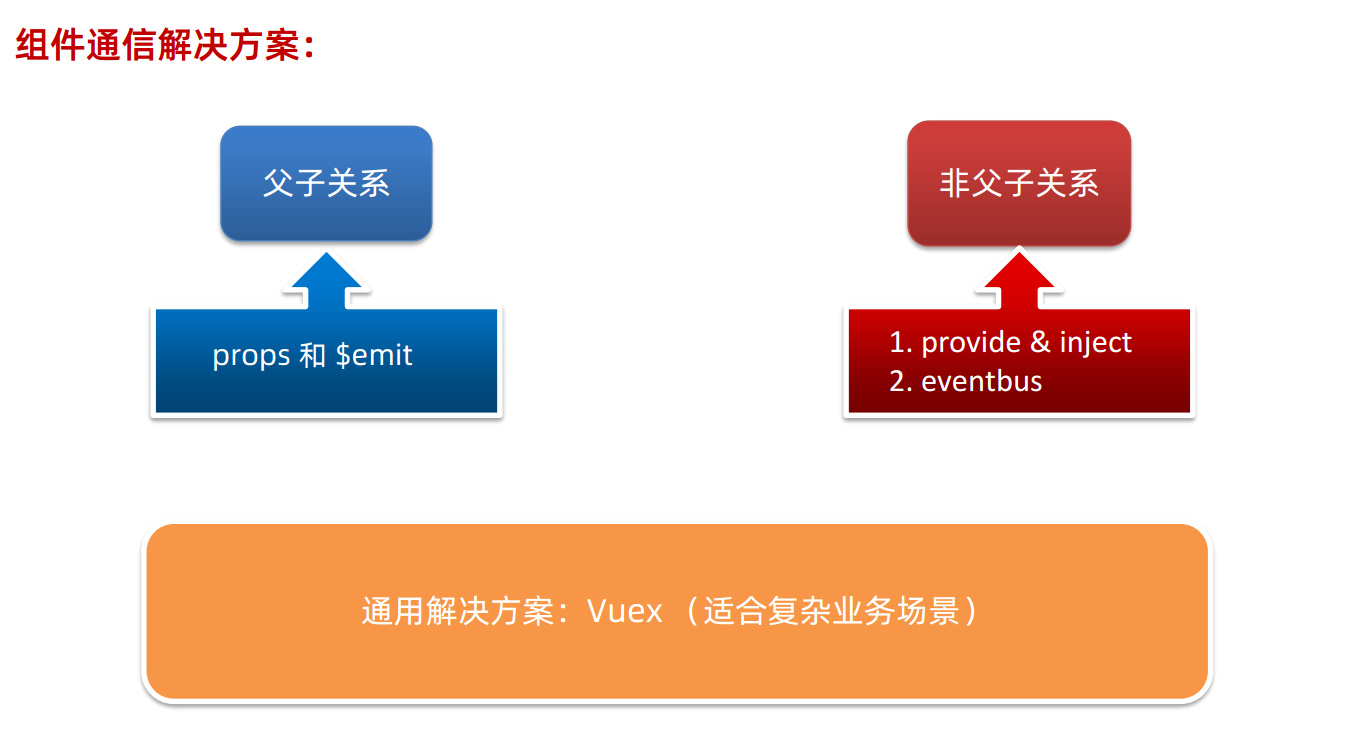
组件通信解决方案:
两种组件关系分类 和 对应的组件通信方案
- 父子关系 → props & $emit
- 非父子关系 → provide & inject 或 eventbus
- 通用方案 → vuex(复杂业务场景)
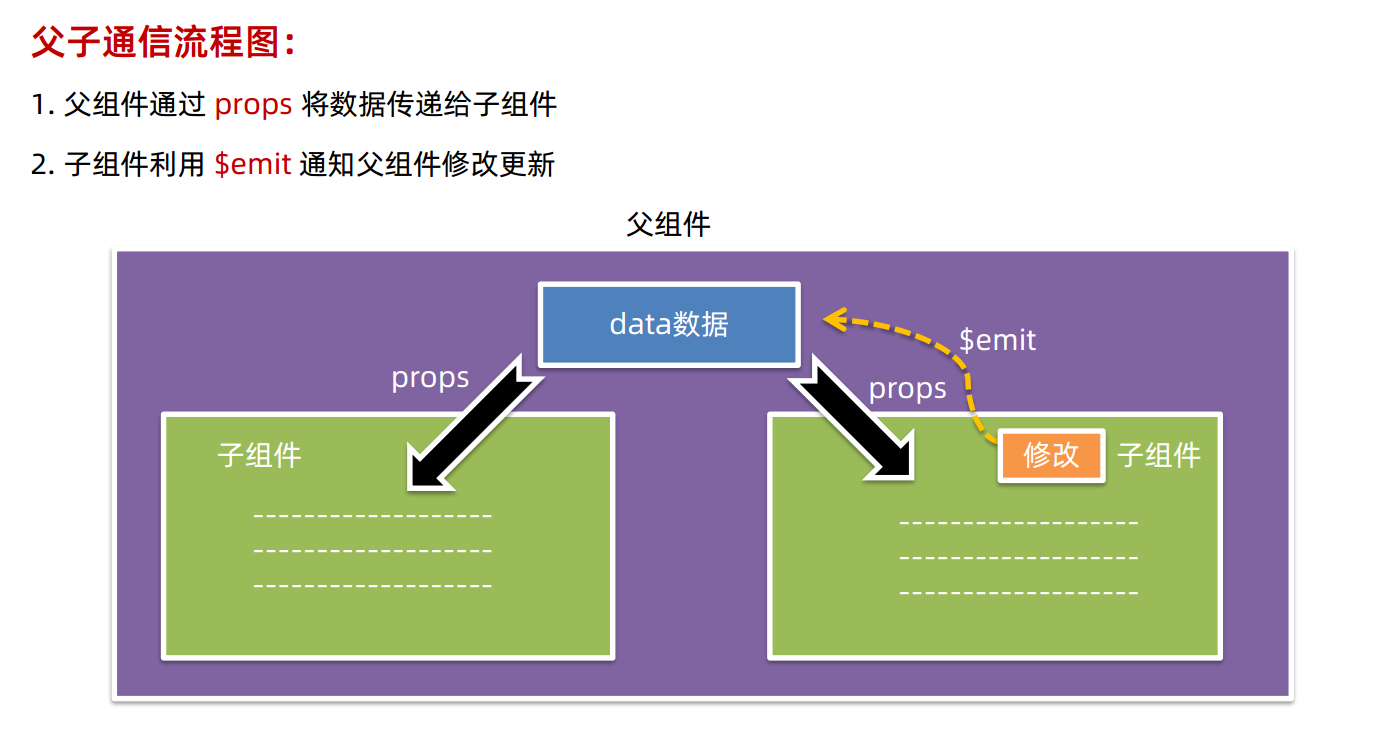
父子通信流程图:
- 父组件通过 props 将数据传递给子组件
- 子组件利用 $emit 通知父组件修改更新
父 → 子
- 父组件通过在子组件标签上添加传值属性名的方式,将数据绑定给子组件
- 通过v-bind,即
:属性名的方式,动态绑定属性 - 通过
:传值属性名="具体需要动态传递的data属性名"将data中数据传出来到组件属性上
- 通过v-bind,即
- 子组件通过 props+数组 的方式,接收多个传值,将数据从父组件拿到,渲染时直接使用传值属性名
<template>
  <div class="app" style="border: 3px solid #000; margin: 10px">
    我是APP组件
    <!-- 1.给组件标签,添加属性方式 赋值 -->
    <Son :title="myTitle"></Son>
  </div>
</template>

<script>
import Son from './components/Son.vue'
export default {
  name: 'App',
  data() {
    return {
      myTitle: '学前端,就来黑马程序员',
    }
  },
  components: {
    Son,
  },
}
</script>

<style>
</style><template>
<div class="son" style="border:3px solid #000;margin:10px">
<!-- 3.直接使用props的值 -->
我是Son组件 {{title}}
</div>
</template>
<script>
export default {
name: 'Son-Child',
// 2.通过props来接收
props:['title']
}
</script>
<style>
</style>子 → 父
- 子组件利用 $emit 通知父组件,进行修改更新
- 在子组件按钮中,绑定点击事件
@click="点击事件的触发函数" - 在子组件的方法中,点击事件的触发函数里,通过
this.$emit方法来触发事件,emit意为发射 - 给内容传递起一个通知事件名,然后
this.$emit('父组件绑定的接收通知事件名','传递内容')来将内容通知给父组件的监听事件
- 在子组件按钮中,绑定点击事件
- 父组件通过
@父组件绑定的接收通知事件名="接收函数",将接收的内容,作为形参参数,传进去父组件方法里的接收处理函数中,作用并更新数据
<template>
  <div class="son" style="border: 3px solid #000; margin: 10px">
    我是Son组件 {{ title }}
    <button @click="changeFn">修改title</button>
  </div>
</template>

<script>
export default {
  name: 'Son-Child',
  props: ['title'],
  methods: {
    changeFn() {
      // 通过this.$emit() 向父组件发送通知
      this.$emit('changTitle','传智教育')
    },
  },
}
</script>

<style>
</style><template>
<div class="app" style="border: 3px solid #000; margin: 10px">
我是APP组件
<!-- 2.父组件对子组件的消息进行监听 -->
<Son :title="myTitle" @changTitle="handleChange"></Son>
</div>
</template>
<script>
import Son from './components/Son.vue'
export default {
name: 'App',
data() {
return {
myTitle: '学前端,就来黑马程序员',
}
},
components: {
Son,
},
methods: {
// 3.提供处理函数,提供逻辑
handleChange(newTitle) {
this.myTitle = newTitle
},
},
}
</script>
<style>
</style>- 父子通信方案的核心流程
- 父传子props:
- ① 父中给子添加属性传值
:传值属性名="具体需要动态传递的data属性名" - ② 子props 接收
props:['传值属性名'] - ③ 子组件使用
{{传值属性名}}
- ① 父中给子添加属性传值
- 子传父$emit:
- ① 子$emit 发送消息
@click="点击事件的触发函数"+点击事件的触发函数(){this.$emit('通知事件名','传递内容')} - ② 父中给子添加消息监听
@通知事件名="接收函数" - ③ 父中实现处理函数
回去具体需要动态传递的data属性名=接收函数形参赋值
- ① 子$emit 发送消息
- 父子关系传递,都借助了所在的Vue实例,通过this来实现调用
- 父传子props:
什么是 prop
- Prop 定义:组件上 注册的一些 自定义属性
- Prop 作用:向子组件传递数据
特点:
- ⚫ 可以 传递 任意数量 的prop
- ⚫ 可以 传递 任意类型 的prop
<template>
  <div class="userinfo">
    <h3>我是个人信息组件</h3>
    <div>姓名:{{username}}</div>
    <div>年龄:{{age}}</div>
    <div>是否单身:{{isSingle?'是':'否'}}</div>
    <div>座驾:{{car.brand}}</div>
    <div>兴趣爱好:{{hobby.join('、')}}</div>
  </div>
</template>

<script>
export default {
  props:['username','age','isSingle','car','hobby']
}
</script>

<style>
.userinfo {
  width: 300px;
  border: 3px solid #000;
  padding: 20px;
}
.userinfo > div {
  margin: 20px 10px;
}
</style><template>
<div class="app">
<UserInfo
:username="username"
:age="age"
:isSingle="isSingle"
:car="car"
:hobby="hobby"
></UserInfo>
</div>
</template>
<script>
import UserInfo from './components/UserInfo.vue'
export default {
data() {
return {
username: '小帅',
age: 28,
isSingle: true,
car: {
brand: '宝马',
},
hobby: ['篮球', '足球', '羽毛球'],
}
},
components: {
UserInfo,
},
}
</script>
<style>
</style>props 校验
思考:组件的 prop 可以乱传么?
目的:为了保证组件的正常运行,需要传递正确的props
作用:为组件的 prop 指定验证要求,不符合要求,控制台就会有错误提示 → 帮助开发者,快速发现错误
语法:
- ① 类型校验
- ② 非空校验
- ③ 默认值
- ④ 自定义校验
① 类型校验,将原有的props数组,改为props对象
props: {
  校验的属性名: 类型 // Number String Boolean Array Object Function...
},
进度条组件,需要数字类型
<template>
  <div class="base-progress">
    <div class="inner" :style="{ width: w + '%' }">
      <span>{{ w }}%</span>
    </div>
  </div>
</template>

<script>
export default {
  props: {
    w: Number,
  },
}
</script>

<style scoped>
.base-progress {
  height: 26px;
  width: 400px;
  border-radius: 15px;
  background-color: #272425;
  border: 3px solid #272425;
  box-sizing: border-box;
  margin-bottom: 30px;
}
.inner {
  position: relative;
  background: #379bff;
  border-radius: 15px;
  height: 25px;
  box-sizing: border-box;
  left: -3px;
  top: -2px;
}
.inner span {
  position: absolute;
  right: 0;
  top: 26px;
}
</style><template>
<div class="app">
<BaseProgress :w="width"></BaseProgress>
</div>
</template>
<script>
import BaseProgress from './components/BaseProgress.vue'
export default {
data() {
return {
width: 30,
}
},
components: {
BaseProgress,
},
}
</script>
<style>
</style>- ② 非空校验 + ③ 默认值 + ④ 自定义校验
- 将校验的属性名,写成一个对象,提供需要校验的参数
- 意义:细化校验要求,减少耦合bug,更稳定地使用组件
props: {
  校验的属性名: {
    type: 类型,  // Number String Boolean ...
    required: true, // 是否必填
    default: 默认值, // 默认值
    validator (value) {
      // 自定义校验逻辑
      return 是否通过校验
    }
  }
},<template>
<div class="base-progress">
<div class="inner" :style="{ width: w + '%' }">
<span>{{ w }}%</span>
</div>
</div>
</template>
<script>
export default {
// 1.基础写法(类型校验)
// props: {
// w: Number,
// },
// 2.完整写法(类型、默认值、非空、自定义校验)
props: {
w: {
type: Number,
required: true,
default: 0,
validator(val) {
// console.log(val)
if (val >= 100 || val <= 0) {
console.error('传入的范围必须是0-100之间')
return false
} else {
return true
}
},
},
},
}
</script>
<style scoped>
.base-progress {
height: 26px;
width: 400px;
border-radius: 15px;
background-color: #272425;
border: 3px solid #272425;
box-sizing: border-box;
margin-bottom: 30px;
}
.inner {
position: relative;
background: #379bff;
border-radius: 15px;
height: 25px;
box-sizing: border-box;
left: -3px;
top: -2px;
}
.inner span {
position: absolute;
right: 0;
top: 26px;
}
</style><template>
<div class="app">
<BaseProgress :w="width"></BaseProgress>
</div>
</template>
<script>
import BaseProgress from './components/BaseProgress.vue'
export default {
data() {
return {
width: 30,
}
},
components: {
BaseProgress,
},
}
</script>
<style>
</style>prop & data 单向数据流
共同点:都可以给组件提供数据。
区别:
- ⚫ data 的数据是自己的 → 随便改
- ⚫ prop 的数据是外部的 → 不能直接改,要遵循 单向数据流
单向数据流:
- 父级 prop 的数据更新,会向下流动,影响子组件。这个数据流动是单向的
<template>
  <div class="base-count">
    <button @click="handleSub">-</button>
    <span>{{ count }}</span>
    <button @click="handleAdd">+</button>
  </div>
</template>

<script>
export default {
  // 1.自己的数据随便修改  (谁的数据 谁负责)
  // data () {
  //   return {
  //     count: 100,
  //   }
  // },
  // 2.外部传过来的数据 不能随便修改
  props: {
    count: {
      type: Number,
    },
  },
  methods: {
    handleSub() {
      this.$emit('changeCount', this.count - 1)
    },
    handleAdd() {
      this.$emit('changeCount', this.count + 1)
    },
  },
}
</script>

<style>
.base-count {
  margin: 20px;
}
</style><template>
<div class="app">
<BaseCount :count="count" @changeCount="handleChange"></BaseCount>
</div>
</template>
<script>
import BaseCount from './components/BaseCount.vue'
export default {
components:{
BaseCount
},
data(){
return {
count:100
}
},
methods:{
handleChange(newVal){
// console.log(newVal);
this.count = newVal
}
}
}
</script>
<style>
</style>- 总结:
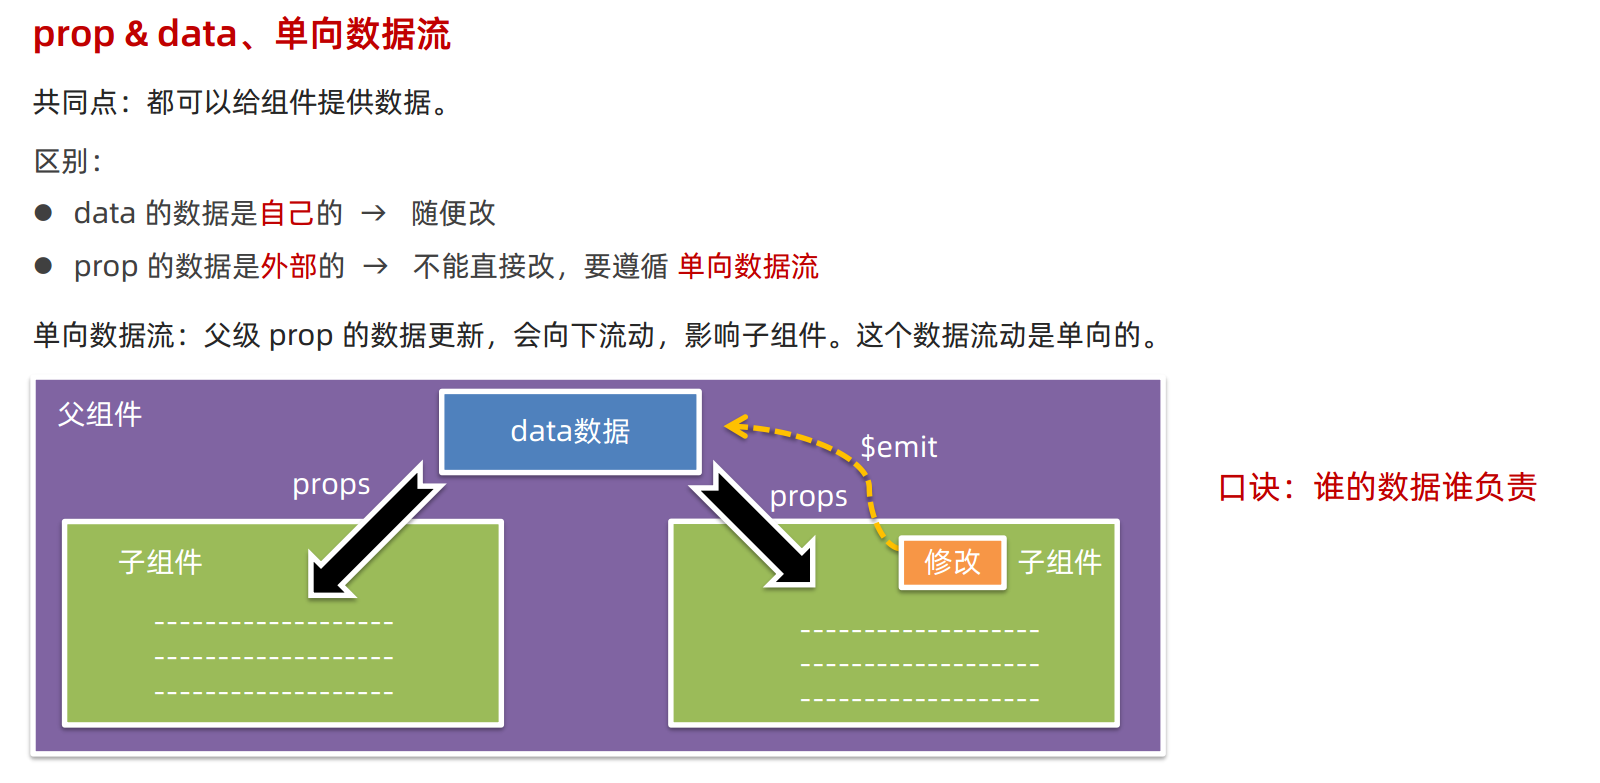
组件通信案例:小黑记事本 - 组件版
- 需求说明:
- ① 拆分基础组件
- ② 渲染待办任务
- ③ 添加任务
- ④ 删除任务
- ⑤ 底部合计 和 清空功能
- ⑥ 持久化存储
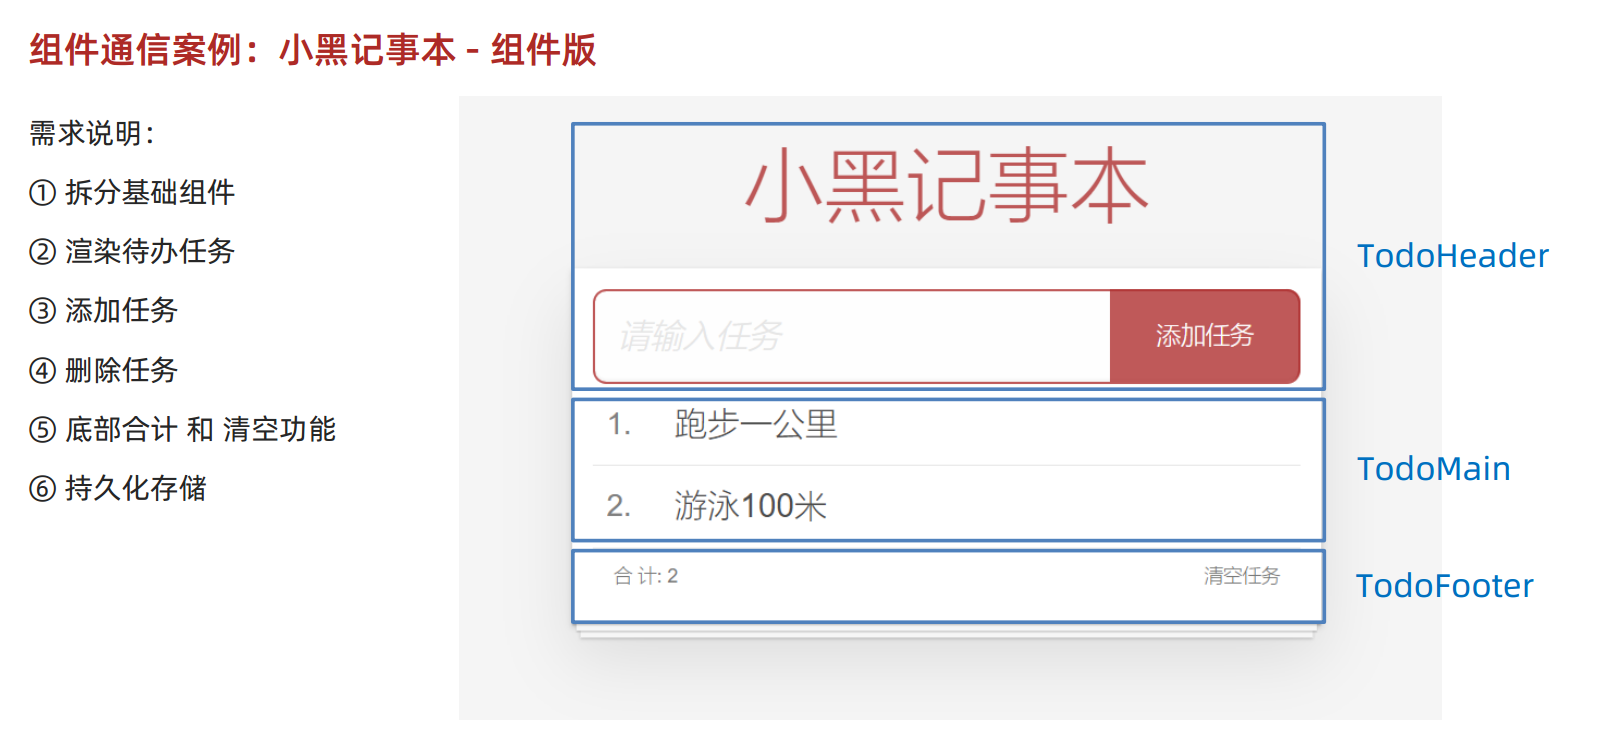
- 核心步骤:
- ① 拆分基础组件
- 新建组件 →
- 拆分存放结构 →
- 导入注册使用
- ② 渲染待办任务
- 提供数据(公共父组件) →
- 父传子传递 list →
- v-for 渲染
- 分析:数据在各个子组件有用到,因此数据需要存入父级组件
- ③ 添加任务
- 收集数据 v-model →
- 监听事件(回车+点击都要添加) →
- 子传父传递任务 →
- 父组件 unshift
- 清空文本框输入的内容
- 对输入的空数据 进行判断
- ④ 删除任务
- 监听删除携带 id →
- 子传父传递 id →
- 父组件 filter 删除
- ⑤ 底部合计:
- 父传子传递 list →
- 合计展示
- ⑥ 清空功能:
- 监听点击 →
- 子传父通知父组件 →
- 父组件清空
- ⑦ 持久化存储:
- watch监视list数据变化,持久化到本地
- 往本地存储 ->
- 进入页面优先读取本地数据
- ① 拆分基础组件
html,
body {
  margin: 0;
  padding: 0;
}
body {
  background: #fff;
}
button {
  margin: 0;
  padding: 0;
  border: 0;
  background: none;
  font-size: 100%;
  vertical-align: baseline;
  font-family: inherit;
  font-weight: inherit;
  color: inherit;
  -webkit-appearance: none;
  appearance: none;
  -webkit-font-smoothing: antialiased;
  -moz-osx-font-smoothing: grayscale;
}

body {
  font: 14px 'Helvetica Neue', Helvetica, Arial, sans-serif;
  line-height: 1.4em;
  background: #f5f5f5;
  color: #4d4d4d;
  min-width: 230px;
  max-width: 550px;
  margin: 0 auto;
  -webkit-font-smoothing: antialiased;
  -moz-osx-font-smoothing: grayscale;
  font-weight: 300;
}

:focus {
  outline: 0;
}

.hidden {
  display: none;
}

#app {
  background: #fff;
  margin: 180px 0 40px 0;
  padding: 15px;
  position: relative;
  box-shadow: 0 2px 4px 0 rgba(0, 0, 0, 0.2), 0 25px 50px 0 rgba(0, 0, 0, 0.1);
}
#app .header input {
  border: 2px solid rgba(175, 47, 47, 0.8);
  border-radius: 10px;
}
#app .add {
  position: absolute;
  right: 15px;
  top: 15px;
  height: 68px;
  width: 140px;
  text-align: center;
  background-color: rgba(175, 47, 47, 0.8);
  color: #fff;
  cursor: pointer;
  font-size: 18px;
  border-radius: 0 10px 10px 0;
}

#app input::-webkit-input-placeholder {
  font-style: italic;
  font-weight: 300;
  color: #e6e6e6;
}

#app input::-moz-placeholder {
  font-style: italic;
  font-weight: 300;
  color: #e6e6e6;
}

#app input::input-placeholder {
  font-style: italic;
  font-weight: 300;
  color: gray;
}

#app h1 {
  position: absolute;
  top: -120px;
  width: 100%;
  left: 50%;
  transform: translateX(-50%);
  font-size: 60px;
  font-weight: 100;
  text-align: center;
  color: rgba(175, 47, 47, 0.8);
  -webkit-text-rendering: optimizeLegibility;
  -moz-text-rendering: optimizeLegibility;
  text-rendering: optimizeLegibility;
}

.new-todo,
.edit {
  position: relative;
  margin: 0;
  width: 100%;
  font-size: 24px;
  font-family: inherit;
  font-weight: inherit;
  line-height: 1.4em;
  border: 0;
  color: inherit;
  padding: 6px;
  box-shadow: inset 0 -1px 5px 0 rgba(0, 0, 0, 0.2);
  box-sizing: border-box;
  -webkit-font-smoothing: antialiased;
  -moz-osx-font-smoothing: grayscale;
}

.new-todo {
  padding: 16px;
  border: none;
  background: rgba(0, 0, 0, 0.003);
  box-shadow: inset 0 -2px 1px rgba(0, 0, 0, 0.03);
}

.main {
  position: relative;
  z-index: 2;
}

.todo-list {
  margin: 0;
  padding: 0;
  list-style: none;
  overflow: hidden;
}

.todo-list li {
  position: relative;
  font-size: 24px;
  height: 60px;
  box-sizing: border-box;
  border-bottom: 1px solid #e6e6e6;
}

.todo-list li:last-child {
  border-bottom: none;
}

.todo-list .view .index {
  position: absolute;
  color: gray;
  left: 10px;
  top: 20px;
  font-size: 22px;
}

.todo-list li .toggle {
  text-align: center;
  width: 40px;
  /* auto, since non-WebKit browsers doesn't support input styling */
  height: auto;
  position: absolute;
  top: 0;
  bottom: 0;
  margin: auto 0;
  border: none; /* Mobile Safari */
  -webkit-appearance: none;
  appearance: none;
}

.todo-list li .toggle {
  opacity: 0;
}

.todo-list li .toggle + label {
  /*
		Firefox requires `#` to be escaped - https://bugzilla.mozilla.org/show_bug.cgi?id=922433
		IE and Edge requires *everything* to be escaped to render, so we do that instead of just the `#` - https://developer.microsoft.com/en-us/microsoft-edge/platform/issues/7157459/
	*/
  background-image: url('data:image/svg+xml;utf8,%3Csvg%20xmlns%3D%22http%3A//www.w3.org/2000/svg%22%20width%3D%2240%22%20height%3D%2240%22%20viewBox%3D%22-10%20-18%20100%20135%22%3E%3Ccircle%20cx%3D%2250%22%20cy%3D%2250%22%20r%3D%2250%22%20fill%3D%22none%22%20stroke%3D%22%23ededed%22%20stroke-width%3D%223%22/%3E%3C/svg%3E');
  background-repeat: no-repeat;
  background-position: center left;
}

.todo-list li .toggle:checked + label {
  background-image: url('data:image/svg+xml;utf8,%3Csvg%20xmlns%3D%22http%3A//www.w3.org/2000/svg%22%20width%3D%2240%22%20height%3D%2240%22%20viewBox%3D%22-10%20-18%20100%20135%22%3E%3Ccircle%20cx%3D%2250%22%20cy%3D%2250%22%20r%3D%2250%22%20fill%3D%22none%22%20stroke%3D%22%23bddad5%22%20stroke-width%3D%223%22/%3E%3Cpath%20fill%3D%22%235dc2af%22%20d%3D%22M72%2025L42%2071%2027%2056l-4%204%2020%2020%2034-52z%22/%3E%3C/svg%3E');
}

.todo-list li label {
  word-break: break-all;
  padding: 15px 15px 15px 60px;
  display: block;
  line-height: 1.2;
  transition: color 0.4s;
}

.todo-list li.completed label {
  color: #d9d9d9;
  text-decoration: line-through;
}

.todo-list li .destroy {
  display: none;
  position: absolute;
  top: 0;
  right: 10px;
  bottom: 0;
  width: 40px;
  height: 40px;
  margin: auto 0;
  font-size: 30px;
  color: #cc9a9a;
  margin-bottom: 11px;
  transition: color 0.2s ease-out;
}

.todo-list li .destroy:hover {
  color: #af5b5e;
}

.todo-list li .destroy:after {
  content: '×';
}

.todo-list li:hover .destroy {
  display: block;
}

.todo-list li .edit {
  display: none;
}

.todo-list li.editing:last-child {
  margin-bottom: -1px;
}

.footer {
  color: #777;
  padding: 10px 15px;
  height: 20px;
  text-align: center;
  border-top: 1px solid #e6e6e6;
}

.footer:before {
  content: '';
  position: absolute;
  right: 0;
  bottom: 0;
  left: 0;
  height: 50px;
  overflow: hidden;
  box-shadow: 0 1px 1px rgba(0, 0, 0, 0.2), 0 8px 0 -3px #f6f6f6,
    0 9px 1px -3px rgba(0, 0, 0, 0.2), 0 16px 0 -6px #f6f6f6,
    0 17px 2px -6px rgba(0, 0, 0, 0.2);
}

.todo-count {
  float: left;
  text-align: left;
}

.todo-count strong {
  font-weight: 300;
}

.filters {
  margin: 0;
  padding: 0;
  list-style: none;
  position: absolute;
  right: 0;
  left: 0;
}

.filters li {
  display: inline;
}

.filters li a {
  color: inherit;
  margin: 3px;
  padding: 3px 7px;
  text-decoration: none;
  border: 1px solid transparent;
  border-radius: 3px;
}

.filters li a:hover {
  border-color: rgba(175, 47, 47, 0.1);
}

.filters li a.selected {
  border-color: rgba(175, 47, 47, 0.2);
}

.clear-completed,
html .clear-completed:active {
  float: right;
  position: relative;
  line-height: 20px;
  text-decoration: none;
  cursor: pointer;
}

.clear-completed:hover {
  text-decoration: underline;
}

.info {
  margin: 50px auto 0;
  color: #bfbfbf;
  font-size: 15px;
  text-shadow: 0 1px 0 rgba(255, 255, 255, 0.5);
  text-align: center;
}

.info p {
  line-height: 1;
}

.info a {
  color: inherit;
  text-decoration: none;
  font-weight: 400;
}

.info a:hover {
  text-decoration: underline;
}

/*
	Hack to remove background from Mobile Safari.
	Can't use it globally since it destroys checkboxes in Firefox
*/
@media screen and (-webkit-min-device-pixel-ratio: 0) {
  .toggle-all,
  .todo-list li .toggle {
    background: none;
  }

  .todo-list li .toggle {
    height: 40px;
  }
}

@media (max-width: 430px) {
  .footer {
    height: 50px;
  }

  .filters {
    bottom: 10px;
  }
}<template>
<!-- 主体区域 -->
<section id="app">
<TodoHeader @add="handleAdd"></TodoHeader>
<TodoMain :list="list" @del="handelDel"></TodoMain>
<TodoFooter :list="list" @clear="clear"></TodoFooter>
</section>
</template>
<script>
import TodoHeader from './components/TodoHeader.vue'
import TodoMain from './components/TodoMain.vue'
import TodoFooter from './components/TodoFooter.vue'
// 渲染功能:
// 1.提供数据: 提供在公共的父组件 App.vue
// 2.通过父传子,将数据传递给TodoMain
// 3.利用 v-for渲染
// 添加功能:
// 1.手机表单数据 v-model
// 2.监听事件(回车+点击都要添加)
// 3.子传父,讲任务名称传递给父组件 App.vue
// 4.进行添加 unshift(自己的数据自己负责)
// 5.清空文本框输入的内容
// 6.对输入的空数据 进行判断
// 删除功能
// 1.监听事件(监听删除的点击) 携带id
// 2.子传父,讲删除的id传递给父组件的App.vue
// 3.进行删除filter(自己的数据 自己负责)
// 底部合计:父传子 传list 渲染
// 清空功能:子传父 通知父组件 → 父组件进行更新
// 持久化存储:watch深度监视list的变化 -> 往本地存储 ->进入页面优先读取本地数据
export default {
data() {
return {
list: JSON.parse(localStorage.getItem('list')) || [
{ id: 1, name: '打篮球' },
{ id: 2, name: '看电影' },
{ id: 3, name: '逛街' },
],
}
},
components: {
TodoHeader,
TodoMain,
TodoFooter,
},
watch: {
list: {
deep: true,
handler(newVal) {
localStorage.setItem('list', JSON.stringify(newVal))
},
},
},
methods: {
handleAdd(todoName) {
// console.log(todoName)
this.list.unshift({
id: +new Date(),
name: todoName,
})
},
handelDel(id) {
// console.log('老爹接收到了id',id);
this.list = this.list.filter((item) => item.id !== id)
},
clear() {
this.list = []
},
},
}
</script>
<style>
</style><template>
<!-- 输入框 -->
<header class="header">
<h1>小黑记事本</h1>
<input placeholder="请输入任务" class="new-todo" v-model="todoName" @keyup.enter="handleAdd"/>
<button class="add" @click="handleAdd">添加任务</button>
</header>
</template>
<script>
export default {
data(){
return {
todoName:''
}
},
methods:{
handleAdd(){
// console.log(this.todoName)
if (this.todoName.trim()===''){
alert('输入不能为空')
return
}
this.$emit('add',this.todoName)
this.todoName = ''
}
}
}
</script>
<style>
</style><template>
<!-- 列表区域 -->
<section class="main">
<ul class="todo-list">
<li class="todo" v-for="(item, index) in list" :key="item.id">
<div class="view">
<span class="index">{{ index + 1 }}.</span>
<label>{{ item.name }}</label>
<button class="destroy" @click="handleDel(item.id)"></button>
</div>
</li>
</ul>
</section>
</template>
<script>
export default {
props: {
list: {
type: Array,
},
},
methods: {
handleDel(id) {
this.$emit('del', id)
},
},
}
</script>
<style>
</style><template>
<!-- 统计和清空 -->
<footer class="footer">
<!-- 统计 -->
<span class="todo-count"
>合 计:<strong> {{ list.length }} </strong></span
>
<!-- 清空 -->
<button class="clear-completed" @click="clear">清空任务</button>
</footer>
</template>
<script>
export default {
props: {
list: {
type: Array,
},
},
methods:{
clear(){
this.$emit('clear')
}
}
}
</script>
<style>
</style>非父子通信 (拓展) - event bus 事件总线
- event bus事件总线作用:
- 在非父子组件之间,进行简易消息传递。(复杂场景 → Vuex)
- 本质上是一个空 Vue 实例,并进行导出,放到一个公共目录下
- 作为中间媒介,本质上消息的接收和发送,是利用Vue的事件机制
- 接收方可以多个
- 创建一个都能访问到的事件总线 (本质上是一个空 Vue 实例) → utils/EventBus.js
import Vue from 'vue'
const Bus = new Vue()
export default Bus- A 组件(接收方),监听 Bus 实例的事件
created () {
  Bus.$on('sendMsg事件名', (msg) => {
    this.msg = msg
  })
}- B 组件(发送方),触发 Bus 实例的事件
Bus.$emit('sendMsg事件名', '这是一个消息')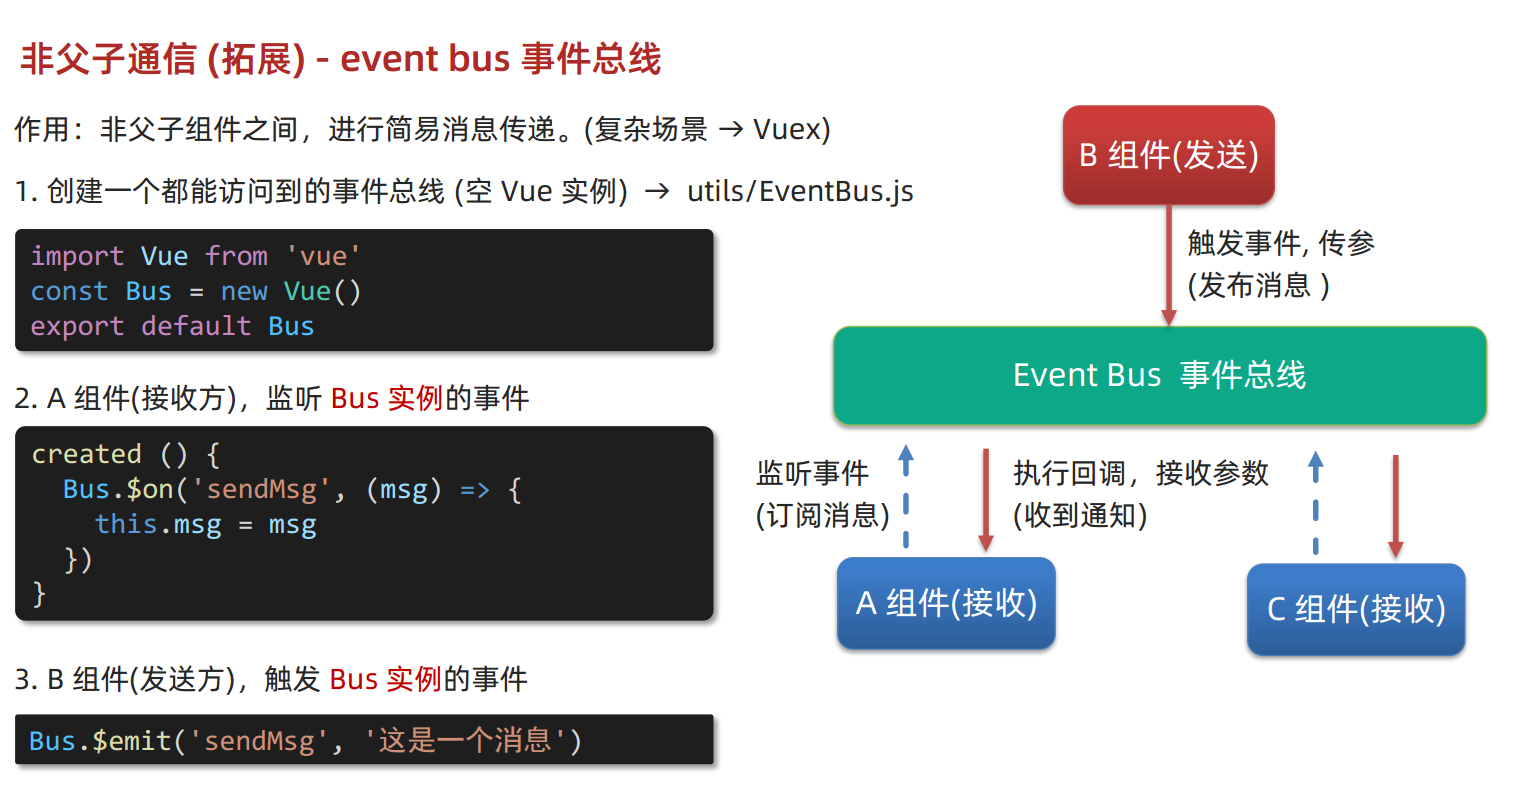
<template>
  <div class="app">
    <BaseA></BaseA>
    <BaseB></BaseB>
    <BaseC></BaseC>
  </div>
</template>

<script>
import BaseA from './components/BaseA.vue'
import BaseB from './components/BaseB.vue'
import BaseC from './components/BaseC.vue'
export default {
  components:{
    BaseA,
    BaseB,
    BaseC
  }
}
</script>

<style>

</style>import Vue from 'vue'
const Bus = new Vue()
export default Bus<template>
<div class="base-a">
我是A组件(接受方)
<p>{{msg}}</p>
</div>
</template>
<script>
import Bus from '../utils/EventBus'
export default {
data() {
return {
msg: '',
}
},
created() {
Bus.$on('sendMsg', (msg) => {
// console.log(msg)
this.msg = msg
})
},
}
</script>
<style scoped>
.base-a {
width: 200px;
height: 200px;
border: 3px solid #000;
border-radius: 3px;
margin: 10px;
}
</style><template>
<div class="base-b">
<div>我是B组件(发布方)</div>
<button @click="sendMsgFn">发送消息</button>
</div>
</template>
<script>
import Bus from '../utils/EventBus'
export default {
methods: {
sendMsgFn() {
Bus.$emit('sendMsg', '今天天气不错,适合旅游')
},
},
}
</script>
<style scoped>
.base-b {
width: 200px;
height: 200px;
border: 3px solid #000;
border-radius: 3px;
margin: 10px;
}
</style><template>
<div class="base-c">
我是C组件(接受方)
<p>{{msg}}</p>
</div>
</template>
<script>
import Bus from '../utils/EventBus'
export default {
data() {
return {
msg: '',
}
},
created() {
Bus.$on('sendMsg', (msg) => {
// console.log(msg)
this.msg = msg
})
},
}
</script>
<style scoped>
.base-c {
width: 200px;
height: 200px;
border: 3px solid #000;
border-radius: 3px;
margin: 10px;
}
</style>- 父子关系传递,都借助了所在的Vue实例,通过this来实现调用
- 非父子/同级关系传递,借助了第三方的Bus实例,作为中间总线来实现调用
非父子通信 (拓展) - provide & inject
- provide & inject 作用:跨层级共享数据。
- 注意:
- 如需使用provide & inject来共享数据,优先将数据包裹成
{}复杂数据对象,以便在使用时能作为响应式数据传递
- 如需使用provide & inject来共享数据,优先将数据包裹成
- 父组件:
- 通过 provide 提供数据,写成一个函数,
- return中写需要实现共享的数据,简单数据类型(非响应式)和复杂数据类型(优先,响应式)都支持
export default {
  provide () {
    return {
      // 普通类型【非响应式】
      color: this.color,
      // 复杂类型【响应式】
      userInfo: this.userInfo,
    }
  }
}- 子/孙组件:
- 通过 inject 取值使用,inject + 数组写属性名,进行接收
- 不论多少层级,都可以
export default {
  inject: ['color','userInfo'],
  created () {
    console.log(this.color, this.userInfo)
  }
}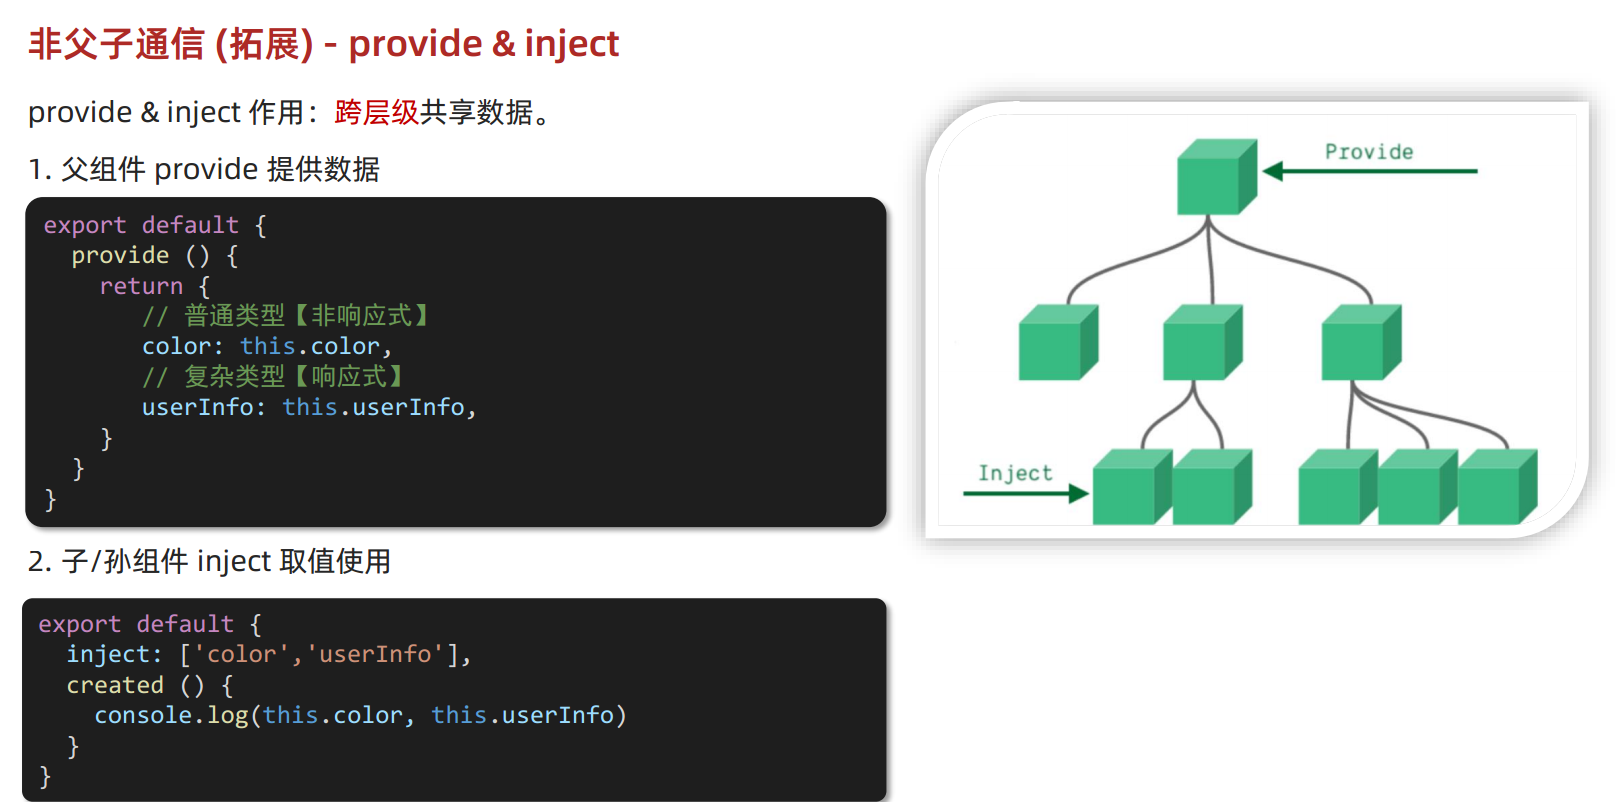
<template>
  <div class="app">
    我是APP组件
    <button @click="change">修改数据</button>
    <SonA></SonA>
    <SonB></SonB>
  </div>
</template>

<script>
import SonA from './components/SonA.vue'
import SonB from './components/SonB.vue'
export default {
  provide() {
    return {
      // 简单类型 是非响应式的
      color: this.color,
      // 复杂类型 是响应式的
      userInfo: this.userInfo,
    }
  },
  data() {
    return {
      color: 'pink',
      userInfo: {
        name: 'zs',
        age: 18,
      },
    }
  },
  methods: {
    change() {
      this.color = 'red'
      this.userInfo.name = 'ls'
    },
  },
  components: {
    SonA,
    SonB,
  },
}
</script>

<style>
.app {
  border: 3px solid #000;
  border-radius: 6px;
  margin: 10px;
}
</style><template>
<div class="SonA">我是SonA组件
<GrandSon></GrandSon>
</div>
</template>
<script>
import GrandSon from '../components/GrandSon.vue'
export default {
components:{
GrandSon
}
}
</script>
<style>
.SonA {
border: 3px solid #000;
border-radius: 6px;
margin: 10px;
height: 200px;
}
</style><template>
<div class="SonB">
我是SonB组件
</div>
</template>
<script>
export default {
}
</script>
<style>
.SonB {
border: 3px solid #000;
border-radius: 6px;
margin: 10px;
height: 200px;
}
</style><template>
<div class="grandSon">
我是GrandSon
{{ color }} -{{ userInfo.name }} -{{ userInfo.age }}
</div>
</template>
<script>
export default {
inject: ['color', 'userInfo'],
}
</script>
<style>
.grandSon {
border: 3px solid #000;
border-radius: 6px;
margin: 10px;
height: 100px;
}
</style>组件通信进阶语法
v-model 原理
了解 v-model 原理的目的:
- 理解 v-model 原理,并将其原理应用在组件通信上
- v-model除了应用在表单元素上,也能用在组件上,作为通信使用
原理:v-model本质上是一个语法糖。
- 例如应用在输入框上,就是 value属性 和 input事件 的合写。
- 即
<input v-model="msg" type="text">等价于<input :value="msg" @input="msg = $event.target.value" type="text"> - 语法糖:语法的一种简写/合写
作用:提供数据的双向绑定
- ① 数据变,视图跟着变
:value:属性名=表达式/赋值
- ② 视图变,数据跟着变
@input@input监听输入框输入="msg赋值=$event.target.value拿输入框的值进行赋值"
- ① 数据变,视图跟着变
注意:
- $event 用于在模板中,获取事件的形参
- $event.target 拿到事件所在的目标,即输入框
- $event.target.value 拿到事件输入框的值,等价于JavaScript中的e.target.value
- 即:拿到事件对象的值(或者说是:拿到事件对象的形参)
- 注意,v-model应用的表单元素不一样,设置的对应的dom属性和事件,会不一样
- v-model会在底层,根据不同的表单元素,自动设置不同的属性和事件
<template>
  <div class="app">
    <input type="text" v-model="msg1" />
    <br />
    <!-- v-model的底层其实就是:value和 @input的简写 -->
    <input type="text" :value="msg2" @input="msg2 = $event.target.value" />
  </div>
</template>

<script>
export default {
  data() {
    return {
      msg1: '',
      msg2: '',
    }
  },
}
</script>

<style>
</style>
表单类组件封装 & 通过v-model简化所封装的代码
- 背景:
- 为了复用表单,会将其封装成表单类组件(例如:下拉菜单,封装成组件)
- 一旦封装成表单组件,即涉及组件通信
- 通过v-model实现组件通信的简化
表单类组件封装
表单类组件封装目的:
- 实现 子组件数据 和 父组件数据 的选择性双向数据传递及渲染样式绑定
封装核心思路:
- 只有数据在父组件上,后续才能进行表单提交
- 基础类数据都放到 子组件中
- 操作后的有效数据放到 父组件中
- 预设的选定数据是父组件 props 传递 过来的
- 下拉的按钮作为子组件,在父组件中监听点击下拉的事件
- 表单类组件 封装,子组件数据 和 父组件数据 的选择性双向数据传递及渲染样式绑定
- 封装流程:
- ① 父传子:预设的选定数据 是父组件通过 props 传递 过来的,在子组件中,通过拆解 v-model 绑定数据
- 在父组件中,通过
:属性名=表达式/赋值,将预设的选定数据取出,并传到子组件 - 在子组件中,通过 props + 对象 进行接收
- 在子组件中,通过
:value="属性名"将预设的选定数据,赋予给选中框显示 - 选中下拉项,通过
@change选中事件=handleChange选中行为函数作为被选中的子组件,通过拆解 v-model 时的监听行为,将选中行为包成行为函数,将选中的值作为参数,传递给监听的事件名 handleChange选中行为函数(e选中事件) {this.$emit('changeCity监听的事件名', e.target.value选中事件的.事件源的.形参,即选中的.输入框的.值)},
- 在父组件中,通过
- ② 子传父:监听输入,子传父传值给父组件修改
- 在子组件中,通过
this.$emit将数据包在handleChange选中行为函数,以changeCity监听的事件名传递给父组件 - 在父组件中,通过
@changeCity监听的事件名="属性名=新值(即形参$event)",通过$event将监听到的事件形参,赋值回去data
- 在子组件中,通过
- ① 父传子:预设的选定数据 是父组件通过 props 传递 过来的,在子组件中,通过拆解 v-model 绑定数据
父组件(使 用)
<BaseSelect :cityId="selectId" @事件名="selecteId = $event" />子组件(封 装)
<select :value="cityId" @change="handleChange">...</select>

props: {
  cityId: String
},

methods: {
  handleChange (e) {
    this.$emit('事件名', e.target.value)
  }
}<template>
<div class="app">
<BaseSelect
<!-- 默认值传给子组件 -->
:cityId="selectId"
<!-- 从子组件拿到选中值 -->
@changeCity="selectId = $event"
></BaseSelect>
</div>
</template>
<script>
import BaseSelect from './components/BaseSelect.vue';
export default {
data() {
return {
selectId: '102',
}
},
components: {
BaseSelect,
},
}
</script>
<style>
</style><template>
<div>
<!-- 拿到父组件传入的默认值选定,并且将点击的事件绑定函数 -->
<select :value="cityId" @change="handleChange">
<option value="101">北京</option>
<option value="102">上海</option>
<option value="103">武汉</option>
<option value="104">广州</option>
<option value="105">深圳</option>
</select>
</div>
</template>
<script>
export default {
props: {
cityId: String,
},
methods: {
handleChange(e) {
this.$emit('changeCity', e.target.value)
},
},
}
</script>
<style>
</style>通过v-model简化所封装的代码
- 在父组件身上通过 v-model 简化代码,实现 子组件 和 父组件数据 双向绑定
背景:
- 由于在父组件中,既将data中的默认值传递给子组件,又从子组件中拿到选中后的新值存入data
- 本质上,可以在父组件中,直接使用 v-model 来实现数据双向绑定,自己的data数据给自己的样式作双向绑定
- 但子组件中不能用,因为拿到的值和上传的值不一样
- v-model =>等于=> :value + @input
① 子组件中:props 通过 value 接收,事件触发 input
- 在子组件中,需要将 v-model 拆出
:value="value",作为单向的数据接收 - 在子组件中,通过
@change选中事件=handleChange选中行为函数 - 通过
handleChange选中行为函数(e选中事件) {this.$emit('使用表单v-model中的单腿input事件名', e.target.value选中事件的.事件源的.形参,即选中的.输入框的.值)},将选中的值,传入v-model的元素
- 在子组件中,需要将 v-model 拆出
② 父组件中:v-model 给组件直接绑数据(
:value + @input)
父组件(使 用)
<BaseSelect v-model="selectId"></BaseSelect>子组件(封 装)
<select :value="value" @change="handleChange">...</select>

props: {
  value: String
},

methods: {
  handleChange (e) {
    this.$emit('input', e.target.value)
  }
}<template>
<div class="app">
<BaseSelect
v-model="selectId"
></BaseSelect>
</div>
</template>
<script>
import BaseSelect from './components/BaseSelect.vue'
export default {
data() {
return {
selectId: '102',
}
},
components: {
BaseSelect,
},
}
</script>
<style>
</style><template>
<div>
<select :value="value" @change="handleChange">
<option value="101">北京</option>
<option value="102">上海</option>
<option value="103">武汉</option>
<option value="104">广州</option>
<option value="105">深圳</option>
</select>
</div>
</template>
<script>
export default {
props: {
value: String,
},
methods: {
handleChange(e) {
this.$emit('input', e.target.value)
},
},
}
</script>
<style>
</style>- 总结:
- 表单类基础组件封装思路
- ① 父传子:父组件动态传递 prop 数据,拆解v-model,绑定数据
- ② 子传父:监听输入,子传父传值给父组件修改
- 本质:实现了实现 子组件 和 父组件数据 的双向绑定
- v-model 简化代码的核心步骤
- ① 子组件中:props 通过 value 接收,事件触发 input
- ② 父组件中: v-model 给组件直接绑数据
您是一个经验丰富的前端工程师,帮忙使用vue3的规范,利用v-model,封装一个具有5个下拉项的表单组件

Vue 3 表单组件

HTML:

Copy
<template>
  <div>
    <label for="select">选择项:</label>
    <select v-model="selected">
      <option v-for="option in options" :key="option" :value="option">{{ option }}</option>
    </select>
  </div>
</template>
JavaScript:

Copy
<script>
export default {
  data() {
    return {
      options: ['选项 1', '选项 2', '选项 3', '选项 4', '选项 5'],
      selected: '选项 1'
    }
  }
}
</script>
使用方法:

在你的 Vue 组件中使用这个表单组件,如下所示:

Copy
<template>
  <div>
    <my-select></my-select>
  </div>
</template>

<script>
import MySelect from './MySelect.vue'

export default {
  components: { MySelect }
}
</script>
说明:

v-model 指令用于在表单组件和 Vue 数据模型之间创建双向绑定。
options 数据属性包含下拉选项的数组。
selected 数据属性包含选定选项的值。
当用户更改下拉选项时,selected 数据属性将自动更新。
希望这个封装的表单组件对你有用!
.sync 修饰符
- 作用:可以实现 子组件 与 父组件数据 的 双向绑定,简化代码
- 特点:prop属性名,可以自定义,非固定为 value
- 场景:封装弹框类的基础组件, visible属性 true显示 false隐藏
- 本质:就是
:属性名和@update:属性名合写
父组件(使 用)
<BaseDialog :visible.sync="isShow" />
--------------------------------------<BaseDialog
  :visible="isShow"
  @update:visible="isShow = $event"
/>
子组件(封 装)
props: {
  visible: Boolean
},
this.$emit('update:visible', false)<template>
<div class="app">
<button @click="openDialog">退出按钮</button>
<!-- isShow.sync => :isShow="isShow" @update:isShow="isShow=$event" -->
<BaseDialog :isShow.sync="isShow"></BaseDialog>
</div>
</template>
<script>
import BaseDialog from './components/BaseDialog.vue'
export default {
data() {
return {
isShow: false,
}
},
methods: {
openDialog() {
this.isShow = true
// console.log(document.querySelectorAll('.box'));
},
},
components: {
BaseDialog,
},
}
</script>
<style>
</style><template>
<div class="base-dialog-wrap" v-show="isShow">
<div class="base-dialog">
<div class="title">
<h3>温馨提示:</h3>
<button class="close" @click="closeDialog">x</button>
</div>
<div class="content">
<p>你确认要退出本系统么?</p>
</div>
<div class="footer">
<button>确认</button>
<button>取消</button>
</div>
</div>
</div>
</template>
<script>
export default {
props: {
isShow: Boolean,
},
methods:{
closeDialog(){
this.$emit('update:isShow',false)
}
}
}
</script>
<style scoped>
.base-dialog-wrap {
width: 300px;
height: 200px;
box-shadow: 2px 2px 2px 2px #ccc;
position: fixed;
left: 50%;
top: 50%;
transform: translate(-50%, -50%);
padding: 0 10px;
}
.base-dialog .title {
display: flex;
justify-content: space-between;
align-items: center;
border-bottom: 2px solid #000;
}
.base-dialog .content {
margin-top: 38px;
}
.base-dialog .title .close {
width: 20px;
height: 20px;
cursor: pointer;
line-height: 10px;
}
.footer {
display: flex;
justify-content: flex-end;
margin-top: 26px;
}
.footer button {
width: 80px;
height: 40px;
}
.footer button:nth-child(1) {
margin-right: 10px;
cursor: pointer;
}
</style>ref 和 $refs
- 作用:利用 ref 和 $refs 可以用于 获取 dom 元素, 或 组件实例
例如,图表效果,要获取dom元素
// 基于准备好的dom,初始化echarts实例
const myChart = echarts.init(document.querySelector('.box'));
实际上,JavaScript中的querySelector 查找范围是针对 → 整个页面
特点:利用 ref 和 $refs ,将查找范围缩小 → 当前组件内 (更精确稳定)
① 获取 dom:
- 目标标签 – 添加 ref 属性
<div ref="chartRef">我是渲染图表的容器</div>- 恰当时机(需要先渲染出来后再获取), 通过 this.$refs.xxx, 获取目标标签
mounted () {
  console.log(this.$refs.chartRef)
},<template>
<div class="app">
<div class="base-chart-box">
这是一个捣乱的盒子
</div>
<BaseChart></BaseChart>
</div>
</template>
<script>
import BaseChart from './components/BaseChart.vue'
export default {
components:{
BaseChart
}
}
</script>
<style>
.base-chart-box {
width: 300px;
height: 200px;
}
</style><template>
<div class="base-chart-box" ref="baseChartBox">子组件</div>
</template>
<script>
import * as echarts from 'echarts'
export default {
mounted() {
// 基于准备好的dom,初始化echarts实例
// document.querySelector 会查找项目中所有的元素
// $refs只会在当前组件查找盒子
// var myChart = echarts.init(document.querySelector('.base-chart-box'))
var myChart = echarts.init(this.$refs.baseChartBox)
// 绘制图表
myChart.setOption({
title: {
text: 'ECharts 入门示例',
},
tooltip: {},
xAxis: {
data: ['衬衫', '羊毛衫', '雪纺衫', '裤子', '高跟鞋', '袜子'],
},
yAxis: {},
series: [
{
name: '销量',
type: 'bar',
data: [5, 20, 36, 10, 10, 20],
},
],
})
},
}
</script>
<style scoped>
.base-chart-box {
width: 400px;
height: 300px;
border: 3px solid #000;
border-radius: 6px;
}
</style>作用:利用 ref 和 $refs 可以用于 获取 dom 元素, 或 组件实例
② 获取组件实例:
- 目标组件 – 添加 ref 属性
<BaseForm ref="baseForm"></BaseForm>- 恰当时机, 通过 this.$refs.xxx, 获取目标组件,就可以调用组件对象里面的方法
this.$refs.baseForm.组件方法()<template>
<div class="app">
<h4>父组件 -- <button>获取组件实例</button></h4>
<BaseForm ref="baseForm"></BaseForm>
<button @click="handleGet">获取数据</button>
<button @click="handleReset">重置数据</button>
</div>
</template>
<script>
import BaseForm from './components/BaseForm.vue'
export default {
data (){
return{
}
components: {
BaseForm,
},
methods: {
handleGet() {
console.log(this.$refs.baseForm);
console.log(this.$refs.baseForm.getFormData());
console.log('获取表单数据', this.username, this.password);
},
handleReset() {
this.$refs.baseForm.resetFormData()
},
}
}
</script>
<style>
</style><template>
<div class="app">
<div>
账号: <input v-model="username" type="text">
</div>
<div>
密码: <input v-model="password" type="text">
</div>
</div>
</template>
<script>
export default {
data() {
return {
username: '',
password: '',
}
},
methods: {
getFormData() {
return {
account: this.username,
password: this.password
}
},
resetFormData() {
this.username = ''
this.password = ''
console.log('重置表单数据成功');
},
}
}
</script>
<style scoped>
.app {
border: 2px solid #ccc;
padding: 10px;
}
.app div{
margin: 10px 0;
}
.app div button{
margin-right: 8px;
}
</style>Vue异步dom更新、$nextTick
- 背景需求:编辑标题, 编辑框自动聚焦
- 点击编辑,显示编辑框
- 让编辑框,立刻获取焦点
this.isShowEdit = true  // 显示输入框
this.$refs.inp.focus()  // 获取焦点
背景问题:"显示之后",立刻获取焦点是不能成功的!
背景原因:Vue 是 异步更新 DOM (提升性能)
$nextTick:等 DOM 更新后, 才会触发执行此方法里的函数体
语法: this.$nextTick(函数体)
this.$nextTick(() => {
  this.$refs.inp.focus()
})<template>
<div class="app">
<!-- 是否在编辑状态 -->
<div v-if="isShowEdit">
<input type="text" v-model="editValue" ref="inp" />
<button>确认</button>
</div>
<!-- 默认状态 -->
<div v-else>
<span>{{ title }}</span>
<button @click="handleEdit">编辑</button>
</div>
</div>
</template>
<script>
export default {
data() {
return {
title: '大标题',
isShowEdit: false,
editValue: '',
}
},
methods: {
handleEdit(){
// 1.显示输入框(异步dom更新)
this.isShowEdit = true
// 2.让输入框获取焦点
// 直接this.$refs.inp.focus()获取不了dom,需要等异步更新完
this.$nextTick(() => {
this.$refs.inp.focus()
})
// 实际上使用setTimeout也可以,但是这个是以时间为跨度的,不是以动作的执行状态为跨度,不精准,如果是在倒数的场合,可以使用
//setTimeout(()=>{
// this.$refs.inp.focus()
//},1000)
}
},
}
</script>
<style>
</style>总结:
- Vue是异步更新 DOM 的
- 想要在 DOM 更新完成之后做某件事,可以使用 $nextTick
this.$nextTick(() => {
// 业务逻辑
})